
Installation Sheet

Caution
Caution
Caution
Caution
2013.●● PRINTEDINJAPAN ●●●●-●
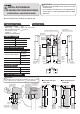
a. HINGE DETAIL
Screw cover
Vertical
adjustment screw
Vertical
adjustment screw
Main body
Base frame
Screw cover
b. DOOR INSTALLATION
ADJUSTMENTS
Door
Door
F
rame
Backward
Forward
Left
Right
Up
Down
Horizontal
adjustment screw
Horizontal
adjustment screw
Front/back
adjustment screw
Front/back
adjustment screw
Vertical adjustment screw
Vertical adjustment screw
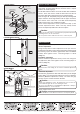
INSTALLATION PROCESS
Make sure the base frame is set firmly in the proper direction before
installing into the cut out of the frame.
Do not open/close door with excessive force, or door may fall.
Remove screw cover and vertical adjustment screw from
hinge body. Separate door side leaf and base frame. Repeat
process for remaining hinge.
Install door side leaf into the cut out of the door with installation
screws. Then, with screws, install the base frame into the cut
out of the door frame. Repeat process for remaining hinge.
Refer to Figure B. Temporarily hang the door by inserting both
upper and lower main hinge bodies into the upper and lower
base frames at the same time. The door will be temporarily
held in place by the easy installation function.
Insert vertical adjustment screws (removed in Step 1) into
vertical adjustment holes. With a hex key, loosely fasten
screws to temporarily hold frame side leaf in place.
ADJUSTMENTS
To prevent door from falling, do not remove front/back adjustment
screw.
Make adjustments in each (vertical and front/back) direction.
Vertical adjustment
Using hex key, loosen vertical adjustment screw just one turn.
Temporarily hold door in place during adjustment of door height
by inserting a piece of wood in gap between floor and bottom
of door. Then tighten screws. Fastening torque is 4.9N
.
m
(50kgf
.
cm).
Front/back adjustment
Loosen front/back adjustment screw just one turn using hex
key. Adjust the door. Then tighten screws. Fastening torque is
4.9N
.
m (50kgf
.
cm).
Horizontal adjustment
To widen the gap between door and door frame (on the hinged
side of door), turn the horizontal adjustment screw in clockwise
direction. (Maximum adjustment is 3mm). To narrow the gap,
turn the screw in counter clockwise direction.
Gently turn adjustment screws, alternating from one screw to the
other and back again. Do not force turning of screws.
Do not loosen adjustment screw (Maximum adjustment is 3mm) in
clockwise
direction, as door may fall.
Finally, replace screw cover.
Door
Door
Frame
Do not handle the covers with excessive force, as they may break.