
Instructions / Assembly


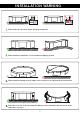
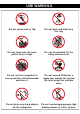

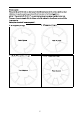


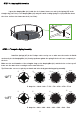
Table Of Contents

④
Layout the Jumping Mat (#1) inside the circle frame. Insert one end of the Spring (#7) in the
triangle ring (1st Point) of the Jumping Mat (
#1) and pull it with Loading SpringTool (#8) and then insert
the other end into the frame
tube hole (1st Point).
1st point
1st point
#7
#4
#8
X shape: 1st→36nd→18th→5 4 th→9 th→45th→27th→6 3
Install the Springs (# 7) in the X -shape order one by one to make sure the tension is distrib-
uted evenly for the Jumping Mat (1
#). Gently tap down against the spring if the hook is not completely in
the hole.
Make sure the serial number of the triangular rings on the Jumping Mat (
#1) and the holes on the top rail
frame are the same when counting from the same direction.
Tip: Please take care not to pinch your hands and other body parts during spring assembly.
th
1st
36nd
1854th th
68
50
32
23
14
5th
rd
th
th
h
59
41th
nd
th
1st-72th
X shape: 1st→40th→20th→60th→10th→50th→30th→
963th th
27th45th
70th
1st
40th
60th 20th
5th
15th
25th
35th
55th
45th
65th
75th
1st-80th
70th 10th
30th50th
STEP 3:Jumping Mat Assembly
12FT
14FT
① ②
③
①
②
③
④
STEP 4:Trampoline Spring Assembly
8