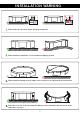
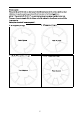
IN STALLATION WARN IN G Please make sure at least 2 people install the trampoline. Please install the trampoline on the flat and non-slippery ground. Please install the springs in the X -shape order one by one as requested in the instructions. Please do not move or lift the trampoline during or after installation but use the tie down stakes kit to secure it.
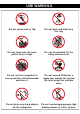
USE WARN IN G D o not somersault or flip. D o not dunk and hold onto the ring. D o not jump onto the trampoline from a height. D o not intentionally hit the safety enclosure net. 3 3 0 LBS D o not use the trampoline in stormy weather but disassemble and store it. D o not exceed 330lbs for a single user and do not exceed the total weight for multiple users. D o not place any sharp objects on the trampoline. D o not use during pregnancy, high blood pressure or other injuries.
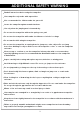
ADDITION AL SAFETY WARN IN G Read all instructions before using the trampoline. U se trampoline only under adult super vision. N ot recommended for children under six years old. Secure the trampoline against unauthorized use. U se only when the jumping mat is clean and dr y. D o not use the trampoline without the spring cover pad. D o not use the trampoline while under the influence of alcohol or drugs. D o not smoke while using the trampoline.
Frame Tube Screw of connector 16 / 4 16 /
5
STEP 1:Frame tube and Leg Extension Assembly Using one Connector (11) connect two frame tube(3) Insert one leg extension(5) into each leg socket in the T Section Attention: Please orient the connector towards the outside of the trampoline.
STEP 2:Install the Balance Bar and Leg Base Screws Screw of balance (10) (6) Balance Bar 【6】 (10) Screw of banlance 【10】 [9] [9] [9] [9] 【6】 【10】 [9] 【10】 【10】 【6】 【10】 【10】 [9] The 12/14FT trampoline is not equipped with balance bar. Please replace the screw (#10) here with screw (#9).
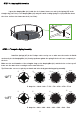
STEP 3:Jumping Mat Assembly Layout the Jumping Mat ( # 1) inside the circle frame. Insert one end of the Spring ( # 7) in the triangle ring (1st Point) of the Jumping Mat ( # 1) and pull it with Loading SpringTool ( # 8) and then insert the other end into the frame tube hole (1st Point). 1st point #7 1st point #8 #4 STEP 4:Trampoline Spring Assembly Install the Springs ( # 7) in the X -shape order one by one to make sure the tension is distributed evenly for the Jumping Mat (1# ).
① ② ③ 1st 84th 15FT 72nd ④ 90th 6th 1st-96th 12th 78th 18th 66th 30th 24th 60th 36th 54th 48th 42nd X shape: 1st →48th→24th→72nd→12th→60th→36th→84th ① ③ ② 1st 95th 16FT 81st ④ 102nd 7th 1st-108th 14th 88th 21st 75th 34th 27th 68th 41st 61st 54th 48th X shape: 1st →54th→27th→81st →14th→68th→41th→95th STEP 5:Frame Pad Assembly A.Lay the Frame Pad over the trampoline so that the springs and the steel frame is covered.
NO A safet net B Fiberglass Stick C Plastic T-connector D E Upper Pole Bottom Pole F Rope 7pc G PE sleeve 10 8pc 8pc 8pc 9pc 12pc 10pc 12pc
Step 6:Insert Bottom Pole(#E) as picture shown . Step 7:Connect the Upper Pole(#D) and Bottom Pole(#E).
Step 8:Put the PE Sleeve(#G) on the pole . Step 9:Insert the fiberglass stick(#B) trough the designed area in the safety net (#A) and connect it to the T-Connector(#C).
Step 10:Insert the Plastic T-Connector (#C) into the top of the upper pole ( bumps should faceleft and right). Press down with your fingers on the bumps on each side of the TConnector. Make surethe cylinders are securely installed (the T-Connector bumps should stick out through the,pole. holes.
Step 11:Startinig from the door, ecure the safety net to the jump mat with ropes(#F) at the bottom of the safety net.
15
16
17