
Product Manual


www.ssilocators.com
14
SERIES
Before you begin, you must choose a Sonde or Camera Head that will match the same frequency
as the
receIver. You will need a Sonde with a frequency of 512Hz to use with the PL-TT Locator
receIver.
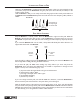
To select SONDE locating mode press the MODE key until the SONDE ICON is displayed on the
LCD. Once in SONDE mode press the FREQUENCY button to select the available SONDE frequency
(512Hz).
The key to Sonde locating success is practice and patience. Before going out on your first locate, it is a
good idea to take your
receIver and Sonde out and try locating the Sonde and calculating the depth.
Attaching a push rod to the Sonde can be
accomplished by using the coupling on the end
of the Sonde.
A spring coupling is recommended to allow
the Sonde to move easier. Or, if you need
to attach the Sonde to a sewer auger, it is
recommended you use duct tape and apply as
shown in the figure below.
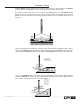
If taping the Sonde on a metal pushing device,
it is recommended to place the battery side of
the Sonde closest to the device. This will allow
for the best performance. Wrap the snake for
approximately 1 foot in the location where the
Sonde is going to be attached.
Also attaching the Sonde 18 inches behind the
cutting head is recommended. First, wrap the
Sonde in the duct tape and then attach the
Sonde to the snake using the duct tape.
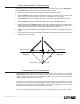
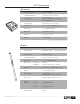
Pre-Tape
Push Rod 12”
Attach 18”
From End
Use the Supplied 3/8” x 16 unc and
5/16“ x 18 unc Push-Rod Adaptors
or
Pretape the Push device for 12”
leaving 18” from the end
Wrap Tape Completely Around Sonde
Attach Wrapped Sonde to Pre-Taped
Section of Push Device
Push-Rod Adaptor
1
2
3
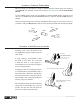
SIDE
SIDE
FRONT
BACK
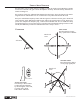
SONDE
loCating a sonde or Camera head
attaChing a push deviCe to the sonde