
Product Manual


3-3
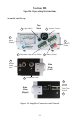
Figure 3-2 LD-12 with Ground Microphone
Hand Switch and Mute Button
Figure 3-2 shows the completely assembled LD-12 with the ground microphone
positioned firmly on the street's surface directly over the water line. The mute
button in the handswitch shown in the user's hand is depressed only when the
ground microphone and cables are completely stationary and the user is ready to
hear the leak. Sound will not be heard until the mute switch button is depressed.
The mute switch button must be released before moving the ground microphone
in order to protect the user's hearing. The mute switch is specifically designed
for this purpose.
Volume Control
Figure 3-1 shows the volume control knob on the amplifier. Turn the volume
control knob clockwise to increase the sound level. Turn the volume control knob
counter-clockwise to decrease the sound level. Always adjust the volume control
to a low level (10% to 25%) when first putting on the headphones and before
depressing the mute switch. Increase the volume gradually until the water leak
sounds can be heard easily but without distortion. Reduce the volume if there is
distortion of the sound.
Amplifier Meter Display
Figure 3-1 shows the amplifier’s meter display of the sound’s intensity.
The meter’s display of the intensity corresponds to the sound’s loudness in the
headphones: a low display for quiet, soft sounds and a high display for loud
sounds. The purpose of the meter display is to assist the user when comparing
the sound’s intensity when the user’s hearing has difficulty distinguishing which