
User Guide


29
DOOR PANELS
Model 430 is offered in three design applica-
tions; stainless steel (S), framed (F) or overlay
(
O). Each of these designs is available as a
glass door (G) or solid door (S) model.
The stainless steel Model 430/S is available in
three finishes—classic, platinum and carbon—
a
nd is shipped from the factory with the deco-
rative stainless steel door panel and handle in
place.
The framed Model 430/F accepts a decorative
front panel which is inserted into the door
frame channel. This panel will be provided by
the customer. The handle is included as part of
the door frame system.
The overlay Model 430/O is designed to accept
a decorative door panel to match surrounding
cabinetry. This door panel and the handle will
be provided by the customer.
The solid door model—with no glass window
—requires a different door panel than the
glass door design.
Before beginning installation, check for the
correct components for the fit and finish
desired. All glass doors models require a deco-
rative panel a minimum of
5
/8" (16) thick. For
the framed Model 430/F solid door, the panel
must be a minimum of
1
/4" (6) thick.
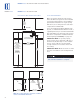
FRAMED DOOR PANEL
Inspect the door panel for the minimum
5
/8"
(16) thickness, the required
1
/4" (6) routing
a
round the perimeter, as shown in illustration
11 on page 30, and the finished inside edge.
The door panel has a weight limit of 25 lbs
(
11 kg). See the Wine Storage section of the
Sub-Zero Design Guide for additional panel
information.
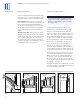
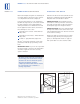
Remove the door handle to install the panel.
The handle screws are hidden by a magnet-
backed trim molding. Remove the molding
using a piece of tape to pull it away from the
handle and expose the handle screws. The
molding will bend at the center so you can
remove it. Refer to illustration 9 below.
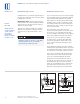
With a Phillips screwdriver, remove the handle
from the door. Slide the panel into the
channels provided by the trim extrusions on
the door. With the door panel in position,
replace the handle. This is an extended version
of the standard Sub-Zero handle, so no routing
of the door panel should be required for proper
finger clearance. Be sure the panel is inserted
completely into the channels for proper fit and
alignment. Refer to illustration 10.
Replace the trim moldings by inserting the top,
then the bottom into the handle channel.
Release the middle and set the magnets.
MODEL 430 INSTALLATION INSTRUCTIONS
PANEL
DESIGN
Additional panel
design information
can be found in
the Sub-Zero
Design Guide.
Check our website
at subzero.com.
Door
Frame
Trim
Panel
Illus. 9
Illus. 10
MODEL 430