installation and operation MODEL 315 ice maker ®
InTRODUCTION Contents The Sub-Zero Model 315 is a restaurant-type ice maker designed for home use. It produces the same high quality clear ice that you would expect from Sub-Zero. Introduction . . . . . . . . . . . . . . . . . . . . . . . . . . . . . . . . 2 Pre-Installation . . . . . . . . . . . . . . . . . . . . . . . . . . . . . 3-5 This guide is intended as a resource for the installation and operation of the Model 315.
PRE-INSTALLATION Technical Information Pre-Installation Considerations Your Sub-Zero ice maker is designed and manufactured with the highest regard for safety and performance. It meets or exceeds the standards of UL, and CUL. Sub-Zero assumes no liability or responsibility of any kind for products manufactured by Sub-Zero that have been altered in any way, including the use of any parts and/or other components not specifically approved by Sub-Zero.
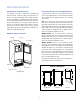
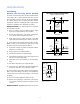
Pre-INSTALLATION Pre-Installation Considerations Area Requirements Purer water will freeze first in the ice making molds. The reason for this is that anything dissolved in water lowers the water’s freezing temperature. Before moving the units in place, be sure the finished dimensions, electrical and plumbing locations and minimum door clearances are accurate. Refer to the "Preinstallation Specifications" illustrations on pages 6 and 7.
Pre-INSTALLATION Moving the Unit Plumbing IMPORTANT NOTE: When you move the unit into the house using a hand truck or dolly, position the dolly on the side of the unit and secure the door so it does not open while transporting the unit. Rough in the water supply line. Connect a 1/4” OD copper line to the house supply. Be sure to use an easily accessible shut-off valve between the supply and the appliance. This shut-off valve should not be installed behind the unit. Do not use “self-piercing” valves.
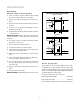
INSTALLATION Plumbing Model 315 – Gravity Drain Model PRE-INSTALLATION SPECIFICATIONS The drain and inlet water tubes must be plumbed before connecting to the ice maker. All horizontal runs of drain lines must have a 1/4" per foot fall. An air gap will likely be required between the ice maker drain tube and the drain/waste receptacle. A stand pipe with a trap below it would be acceptable for the drain/waste receptacle.
INSTALLATION Plumbing Model 315P – Pump Model 1) PRE-INSTALLATION SPECIFICATIONS MODEL 315P (PUMP) Place ice maker in front of installed location. Adjust leg levelers to approximately correct position. 2) Remove control knob, control panel and control access panel. 3) Route water inlet line from wall through ice maker to the front. 4) Locate coil of 3/8" ID plastic drain tubing secured to the back of the cabinet. 5) Route plastic drain tube from back of cabinet to drain connection point.
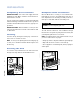
INSTALLATION Completing the Installation Kickplate / Grille Installation IMPORTANT NOTE: Turn on the water supply and check all fittings for leaks. Make certain the electrical harness is attached to the solenoid. Once the Model 315 is secured, you can install the kickplate / grille. As shown in the illustration below, there is some adjustment to the mounting assembly so this decorative piece can fit flush with the surrounding area.
INSTALLATION IMPORTANT NOTE: There is a part, packed with the ice maker, that is required for this procedure. Panel Considerations Refer to instructions for installation under "Panel Installations". You should be sure of panel sizes and placement before proceeding with installation. If you have questions, contact the selling Sub-Zero dealer or cabinet supplier. Instructions regarding sizing of the panels are provided in the "Sub-Zero Design Guide".
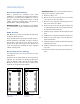
INSTALLATION Panel Installation Door Panel Dimensions The Model 315 will easily accommodate a door panel as long as you follow these points. Models 315 and 315P Door Panel Width (1/8" reveal) Door Panel Height (4" toe space, 1/8" reveal) CAUTION Door Panel Thickness Please exercise caution when drilling holes for mounting hardware. This is especially critical with inset panels.
INSTALLATION Once you have located the proper position for the hardware, mark the holes, remove template, and drill pilot holes for mounting of the hardware. We recommend starting the first few holes, positioning the hardware, drilling remaining pilot holes, and securing the mounting brackets with the #8 x 1/2" screws. Door Panel Installation Door Panel–15 lb. weight limit Remove the handle side bracket attached to the front of the door and set aside.
INSTALLATION 90 Degree Door Stop Hinge Cover Installation Model 315 has a 90 degree door stop. Follow these steps for installation: This is to be completed after the unit is fully installed. 1) Open door to 80 degrees. IMPORTANT NOTE: Install the 90 degree stop prior to installing the hinge covers. 2) Insert stop pin into the bottom door hinge (pin enters from the top). Refer to the illustration below.
INSTALLATION Installation Check List Think Safety! The importance of the installation of your Model 315 ice maker cannot be overemphasized. The proper installation of your unit is the responsibility of the selling dealer or installer. The following check list should be completed by the installer to ensure no part of the installation has been overlooked. If you are storing or disposing of your old appliance, please do it safely. Child entrapment accidents can be tragic.
OPERATION What Initial Start Up to Expect from Your Ice Maker 1) Remove control box cover. 2) Rotate timer shaft clockwise until the cam is in the harvest position (switch button out). 3) Turn on water supply. 4) With unit plugged in, rotate ice maker control knob to the ON position. 5) Allow the unit to operate for 1 hour, and check the size of the cubes, if they are not correct, adjust as recommended on page 18.
OPERATION Ice Production How the Ice Maker Uses Water There are two distinct cycles: freeze and harvest. The ice maker begins with a fixed charge of water that is contained in the reservoir. As the water is sprayed against the freezing surface, the part of water that does not contain mineral impurities will freeze and stick to the ice cup molds. The water containing impurities falls back into the reservoir.
Cleaning Cleaning Cleaning the Ice Storage Bin IMPORTANT NOTE: Never keep anything in the ice storage bin that is not ice; objects like wine or beer bottles are not only unsanitary, but the labels may slip off and plug up the drain. The ice storage bin should be sanitized occasionally. It is usually convenient to sanitize the bin after the ice making system has been cleaned, and the storage bin is empty.
Cleaning WARNING Cleaning the Ice Making System 1) Open the door and turn the ice maker control knob to off. Sub-Zero ice maker cleaner contains acids. These compounds may cause burns. 2) Scoop out all of the ice, either discard it or save it in a ice chest or cooler. 3) Pour 4 ounces of Sub-Zero ice maker cleaner into the ice maker reservoir. (Available from a local Sub-Zero distributor or dealer, ask for part number 19034306, an 8 ounce bottle). If swallowed, DO NOT induce vomiting.
Maintenance ADJUSTMENTS Winterizing There are three items that may be adjusted: cube size, bin ice level and harvest time. 1) Clean the ice making system. 2) Turn off the water supply. 3) Drain the water reservoir. Remove the pump hose. 4) Disconnect the incoming water line at the inlet water valve. 5) Remove control box cover and turn the timer into the harvest cycle. 6) With the ice maker operating, blow air through the inlet water valve; a tire pump could do the job.
ADJUSTMENTS Bin Ice Level Adjustment Harvest Time Adjustment When the ice maker shuts off the ice level in the bin should be even with the metal tube inside the bin. If the ice in the bin is too high or low, turn the ice maker control knob to adjust the bin thermostat. The amount of harvest time may be adjusted. It is preset from the factory at about 3 minutes, which should be adequate to release all cubes and fill the reservoir.
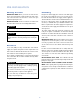
TROUBLESHOOTING Problem Possible Cause Probable Correction The ice maker does not operate The ice maker is unplugged Plug the ice maker in Breaker tripped or fuse is blown Reset breaker/replace fuse – if it happens again, call for service to check for a short circuit in the ice maker Ice maker control turned to OFF Turn ice maker control to ON Bin thermostat open, keeping ice maker off Ice on sensor tube – its then normal for the ice maker to be off Ice maker in a room below 50˚F – room needs to
TROUBLESHOOTING Problem Possible Cause Probable Correction No ice falling in bin, but ice maker operates Ice may be stuck in the evaporator and the unit is "frozen up" Check water supply – filter may be restricted Check inlet water valve – screen may be restricted, or valve does not operate Hot gas valve may not operate -check and repair/replace Harvest time set too short – timer needs adjustment Too much heat load Inlet water valve leaks through, needs to be replaced No water spray Water pump does
WARRANTY "Sub-Zero Protection Plan" Full 5 Year Warranty and Limited 6th Through 12th Year Warranty on the Sealed System Full 2 Year Warranty on Total Product Full Five Year Warranty For five years from the date of original installation, your Sub-Zero warranty covers all parts and labor to repair or replace any components that prove to be defective in materials or workmanship in the sealed system. The sealed system consists of the compressor, condenser, evaporator, drier and all connecting tubing.
SERVICE Service For Your Ice Maker Please have model and serial number available. Contact your nearest Sub-Zero Factory Authorized Service Center in your area, your dealer or Sub-Zero Freezer Company, P.O. Box 44130, Madison, WI 53744-4130, call (800) 222-7820 or e-mail us at customerservice@subzero.com. For installation questions or general product operating information call (800) 222-7820 for your local product distributor or Sub-Zero.
Sub-Zero Freezer Company, Inc. 4717 Hammersley Road Madison, Wisconsin 53711 (800) 222-7820 (608) 271-2233 E-mail: customerservice@subzero.