INSTALLATION GUIDE Multi-Function Cooktop
Contents Important Note Wolf Multi-Function Cooktop . . . . . . . . . . . . . . . . . . . . 3 To ensure the safe and efficient use of Wolf equipment, please take note of the following types of highlighted information throughout this guide: Multi-Function Cooktop Specifications . . . . . . . . . . . . 4 Multi-Function Cooktop Installation . . . . . . . . . . . . . . . 8 Service Information . . . . . . . . . . . . . . . . . . . . . . . . . . .
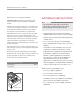
Wolf Multi-Function Cooktop 3 wolfappliance.com/specs IMPORTANT INSTRUCTIONS Multi-Function Cooktop Installation IMPORTANT NOTE: Installation of the Wolf gas multifunction cooktop must be completed by a qualified installer. Read this entire installation guide prior to installation and save for the local inspector’s reference. The homeowner should keep this installation guide for future reference.
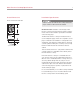
Multi-Function Cooktop Specifications Overall Dimensions 4 Installation Specifications MULTI-FUNCTION COOKTOP Failure to locate the multi-function cooktop without the proper clearances will result in a fire hazard. 21" (533) IMPORTANT NOTE: Installation of the Wolf gas multifunction cooktop must meet minimum clearance requirements shown in the installation specifications illustration on the following page.
Multi-Function Cooktop Specifications 5 wolfappliance.
Multi-Function Cooktop Specifications 6 Gas Supply Requirements GAS SUPPLY LINE EXPLOSION HAZARD: Use a certified gas supply line and install a gas shut-off valve. Securely tighten all gas connections. Failure to follow these instructions can result in explosion, fire or death. IMPORTANT NOTE: This installation must conform with local codes and ordinances. In the absence of local codes, installations must conform with American National Standard, National Fuel Gas Code ANSI Z223.
Multi-Function Cooktop Specifications 7 wolfappliance.com/specs Gas Supply Requirements GAS MANIFOLD PRESSURE • Natural Gas: Standard orifices are set for 5" (12.5 mb) WC (water column). • LP Gas: Standard orifices are set for 10" (25 mb) WC. • Gas Supply Pressure: The maximum gas supply pressure to the regulator should never exceed 14" (34.9 mb) WC; .5 psi (3.5 kPa) for natural and LP gas. The minimum line pressure is 7" (17.5 mb) WC for natural gas and 11" (27.4 mb) WC for LP gas.
Multi-Function Cooktop Specifications 8 Electrical Requirements ELECTRICAL SHOCK HAZARD: Plug into a grounded 3-prong outlet. Do not remove ground prong. Do not use an adapter. Failure to follow these instructions can result in electric shock, fire or death. The Wolf multi-function cooktop requires a 120 V AC, 60 Hz, 15-amp, fused electrical supply. A time-delay fuse or circuit breaker is recommended. It is recommended that a separate circuit serving only this appliance be provided.
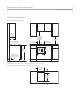
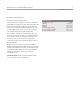
Multi-Function Cooktop Specifications 9 wolfappliance.com/specs Installation Specifications MULTIPLE COOKTOP INSTALLATION Multiple Cooktops If the multi-function cooktop is to be used in combination with additional cooktops or modules with a filler strip, refer to the chart below for the countertop cut-out width. The dimensions are derived by adding an additional 11/4" (32) for each additional unit, to give you the total countertop cut-out width. Dimensions include the filler strip.
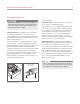
Multi-Function Cooktop Installation 10 Install the Cooktop Remove the multi-function cooktop and gas pressure regulator from its shipping carton and discard packing materials. Lower the multi-function cooktop into the countertop cut-out opening. Center the cooktop in the opening and check that the front edge of cooktop is parallel to the front edge of the countertop. Check that all required clearances are met. Using a pencil, outline the rear edge of the cooktop frame on the countertop.
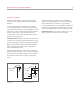
Multi-Function Cooktop Installation 11 wolfappliance.com/specs Install the Cooktop GAS PRESSURE REGULATOR GAS SUPPLY CONNECTION Install the gas pressure regulator with the arrow on the regulator pointing up toward the unit and in a position where you can reach the access cap. Refer to the illustration below. Assemble the flexible metal connector from the gas supply pipe to the gas pressure regulator.
Multi-Function Cooktop Installation 12 Install the Cooktop COMPLETE THE INSTALLATION VERIFY OPERATION Once the multi-function cooktop has been checked for gas leaks, plug the power cord into the grounded electrical outlet. Place the burner head on the burner base and position the burner grate over the burner assembly. The burner of the gas multi-function cooktop uses an electronic igniter in place of a standing pilot.
Multi-Function Cooktop Installation 13 wolfappliance.com/specs Cooktop Removal The multi-function cooktop must be disconnected from the electrical and gas supply prior to removal. IMPORTANT NOTE: Removal of the multi-function cooktop should only be performed by Wolf factory certified service. If removing the multi-function cooktop is necessary for cleaning or service, shut off the gas supply. Disconnect the electrical and gas supply. Remove the mounting brackets on each side of cooktop and remove.
Service Information 14 Service Information If service is necessary, maintain the quality built into your multi-function cooktop by contacting Wolf factory certified service. For the name and number of Wolf factory certified service nearest you, check the contact & support section of our website, wolfappliance.com or call Wolf customer care at 800-222-7820. When calling for service, you will need the model and serial numbers of the multi-function cooktop.
The information and images in this guide are the copyright property of Wolf Appliance, Inc. Neither this guide nor any information or images contained herein may be copied or used in whole or in part without the express written permission of Wolf Appliance, Inc. ©Wolf Appliance, Inc. all rights reserved. Wolf, Wolf & Design, Wolf Gourmet, W & Design and the color red as applied to knobs are registered trademarks and service marks of Wolf Appliance, Inc.
WOLF APPLIANCE, INC. P. O. BOX 44848 MADISON, WI 53744 817485 REV-A 3/ 2011 WOLFAPPLIANCE.COM 800.222.