A10-TX-US Digital Transmitter — User Guide —
A10-TX-US User Guide Copyright / Doc Rev History Info Model A10-TX-US only. See separate documentation for A10-TX model. Copyright © 2020 Audio Ltd. All rights reserved. | www.audioltd.com 7 Century Court, Tolpits Lane, Watford WD18 9RS, UK | info@audioltd.com Revision Date Description 1A 1B Dec 2017 Feb 2018 Initial Publication Added note re: Bluetooth remote range 1C Apr 2018 Edits made in sections: Specifications and Certifications 1D May 2018 Added v1.05 change (i.e.
A10-TX-US User Guide Overview The A10 Digital Wireless System meets the demanding requirements of the professional sound community engaged in film and television production. It offers superb audio and RF performance. The digital RF transmission of the A10 system allows the user to operate up to 20 channels in an 8 MHz TV channel, maximising spectrum efficiency without compromising on range, audio quality or latency. The A10-TX-US is the U.S.-only version of the transmitter.
A10-TX-US User Guide System Quickstart The A10 Digital Wireless System is easy to use. Follow the steps below for basic setup and operation. At the Receiver 1. Fit the included straight and right-angled antennas to the A10-RX receiver. 2. Connect the receiver to a power source. It will immediately power on. 3. Using the scanning tool in the Selection menu find an available open frequency. If multiple wireless systems are in use, make certain to keep frequencies least 400 kHz apart. 4.
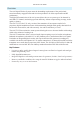
A10-TX-US User Guide Connectors, Controls Description 1 6 2 7 3 8 4 9 5 11 10 12 Figure 1: A10-TX-US transmitter with open battery compartment 1 - Antenna Socket SMA connector, 50 ohm, connects to included 1/4-wave whip antenna. 7 - Input Overload LED Red LED illuminates when input signal is 3dB before clipping. 2 - Power LED Blue LED illuminates when unit is powered on. Flashes when unit is in sleep mode. LED can be turned off in the Menu. 8 - Menu Button Enters the menu selection.
A10-TX-US User Guide Powering The A10-TX-US is powered by two AA (LR6) batteries. For the longest runtime use Lithium primary cells. The transmitter also accepts alkaline primary and Nickel Metal Hydride rechargeable batteries. Select the battery type used in the menu to ensure that the battery condition is indicated accurately in both the transmitter display and receiver. 1. Open the battery compartment by pressing both mechanical releases simultaneously. (See Figure 1.) 2.
A10-TX-US User Guide Menu Control and Menu Selections The A10-TX-US transmitter is controlled through its menu. Enter the menu via the centre Menu button. Once in the menu the Left and Right buttons toggle among options, and the Menu button makes the selection. The Menu Lock feature on the A10-TX provides a way to lock the buttons. Press and hold the Power button while holding the Right button to lock/unlock access to menu settings.
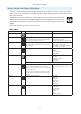
A10-TX-US User Guide Audio Setup Menu Selections Icon Description Options Exit Returns to the main menu. Low Cut Activates a low frequency cut filter to the audio input. 18 dB/octave. • Off • 40 Hz • 60 Hz • 80 Hz • 100 Hz • 200 Hz Limiter The limiter reduces peak levels of the analogue audio input before digital conversion to prevent audio overload. The recommended setting is On. • On • Off Lav / Mic / Line Selects the input type at the LEMO-3 connection.
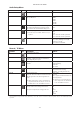
A10-TX-US User Guide Settings Menu Selections Icon Description Options Exit Returns to the main menu. Bluetooth Toggles Bluetooth On or Off. Bluetooth offers external control of the A10-TX via the A10-TX Remote App (for iOS or Android). • On • Off RF Power Sets the RF output power of the transmitter. • Low - 10 mW • Med - 20 mW • High - 50 mW Battery Type For accurate display of battery condition on the transmitter and receiver select the battery type from the available options.
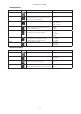
A10-TX-US User Guide System Menu Selections Icon Description Options Exit Returns to the main menu. Sleep When selected, the A10-TX goes into low-power Sleep mode. The blue LED flashes when the unit is in a sleep state. The unit returns to normal power operation when any button is pressed or the transmitter is activated from the A10-TX Remote App. • Sleep Lock Menu Activates a button lock to prevent unintentional changes to menu selections.
A10-TX-US User Guide See the Frequency Tables in this guide for a complete list of frequencies corresponding to the channel and sub channel selections. Audio Input and Control The A10-TX-US input accepts a wide range of audio input types, including lavalier microphones, balanced microphones, and balanced and unbalanced line level signals. 12 V and 48 V phantom power is available for balanced microphones. The Selection Menu offers options for audio level control, input type, limiters, and low cut filter.
A10-TX-US User Guide For best operation and transmission power with the included 1/4-wave antenna keep it in the free field. If worn on a body keep the antenna away from direct contact with the wearer’s body. Recording On the A10-TX-US, the record feature is only available for line and mic-level operations. It is intended for wireless boom and remote microphone locations that do not require a two-wire lavalier. When the A10-TX-US auto-detects the presence of a lavalier microphone, recording is disabled.
A10-TX-US User Guide Timecode and Time-of-Day Clocks The A10-TX-US includes high-precision internal clocks to maintain time-of-day/date and SMPTE timecode. These clocks run continuously when AA batteries are in the unit and draw negligible current (less than 1 uA). The A10-TX-US design incorporates a supercapacitor to power the time-of-day clock for several days in the absence of batteries. The supercapacitor reaches full charge when batteries have been in the unit for five minutes.
A10-TX-US User Guide Remote Control The A10-TX-US can be remotely controlled from an Android or iOS device running the A10-TX Remote app. The app is available as a free download from the Google Play store and iOS App store, respectively. The app appears differently depending on the audio source used with the transmitter.
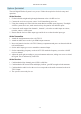
A10-TX-US User Guide 1 1 2 4 3 5 2 6 7 8 When the A10-TX-US transmitter is connected to a lavalier, with the A10-TX Remote app, you can: 1 - Change the transmitter’s name; it is set to 7 - Adjust RF Power the transmitter’s serial number by default 8 - Change TV Ch, Sub Ch and Frequency 2 - Monitor Sleep status, Battery status,Blueª When a user group is loaded, the tooth® signal strength and Mute status TV Ch...
A10-TX-US User Guide pre-assigned a frequency and given an actor’s name. Then only those pre-assigned frequencies that have been named will be available as possible options for tuning. User groups are created in Mic2Wav—a utility application available as a free download from the Audio Ltd. website to Mac or Windows-based computers—and then uploaded, as ALUG files, to A10 transmitters and receivers. To create a new user group: 1. Open Mic2Wav on your computer. 2.
A10-TX-US User Guide Mic2Wav supports the creation of up to eight user groups, each with a max of 32 users, per Audio Limited User Group (ALUG) file. To add additional user groups: 1. In Mic2Wav, select Add Group. 2. Name the new group and select the band of frequencies for the group. 3. Add users (defining name and frequencies) to the group. Audio Limited User Group files (ALUG) may be saved for future use and modification.
A10-TX-US User Guide ª Loading an ALUG file onto the card from the Mic2Wav application will only save the user group currently selected in the drop-down list. 4. Eject the microSD card and insert it back into the transmitter. 5. Press the centre Menu button, then select Settings > User Groups > User > Load New. 6. Select a user group. ª With a user group loaded, the transmitter’s Frequency control changes between different users in the group and their pre-assigned frequencies.
A10-TX-US User Guide Firmware Updates Audio Ltd. issues new firmware for the A10-TX-US transmitter to change and introduce new features to the unit. Make certain to register your Audio Ltd. product at the Audio Ltd. website to receive firmware update notifications. To update firmware: 1. Download the new firmware update file from the Audio Ltd. website and copy the file onto an approved microSD card that has been formatted in the A10-TX-US. 2. Insert the microSD card in the unit. 3.
A10-TX-US User Guide Specifications A10 U.S. Digital Wireless System Frequency Range 470–608 MHz Transmitter Switching Bandwidth U.S. Only Models A10-TX-AU (470–548 MHz) A10-TX-BU (518–608 MHz) Modulation Mode Audio Ltd. proprietary digital RF modulation Digital Audio Codec Audio Ltd.
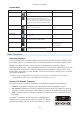
A10-TX-US User Guide Input Connector Wiring Diagram The A10-TX-US LEMO input connector accepts numerous input types. Select the input type in the Selection Menu before connecting an audio source.
A10-TX-US User Guide Certifications FCC Conformity The A10-TX-US transmitter complies with the following requirements: FCC (Federal Communications Commission) Part 74 Operation is subject to the following two conditions: (1) This device may not cause harmful interference, and (2) This device must accept any interference received, including interference that may cause undesired operation. Changes or modification not expressly approved. A10-TX-US frequency ranges supplied for use in USA: • 470.2–547.
A10-TX-US User Guide Frequency Tables The A10-TX-US offers preselected frequencies based on channels and sub channels. X Frequencies (6 MHz Per TV Channel) The chart below shows all frequencies available for the A10-TX-US transmitter. Sub Channel Channel 1 2 3 4 5 6 7 8 9 10 11 12 13 14 15 14 470.2 470.6 471 471.4 471.8 472.2 472.6 473 473.4 473.8 474.2 474.6 475 475.4 475.8 15 476.2 476.6 477 477.4 477.8 478.2 478.6 479 479.4 479.8 480.2 480.6 481 481.4 481.8 16 482.2 482.
A10-TX-US User Guide Y Frequencies (7 MHz Per TV Channel) Sub Channels Channels 1 2 3 4 5 6 7 8 9 10 11 12 13 14 15 16 17 22 485.3 485.7 486.1 486.5 486.9 487.3 487.7 488.1 488.5 488.9 489.3 489.7 490.1 490.5 490.9 491.3 491.7 23 492.3 492.7 493.1 493.5 493.9 494.3 494.7 495.1 495.5 495.9 496.3 496.7 497.1 497.5 497.9 498.3 498.7 24 499.3 499.7 500.1 500.5 500.9 501.3 501.7 502.1 502.5 502.9 503.3 503.7 504.1 504.5 504.9 505.3 505.7 25 506.3 506.7 507.1 507.5 507.9 508.3 508.
A10-TX-US User Guide Z Frequencies (8 MHz Per TV Channel) Sub Channels 1 2 3 4 5 6 7 8 9 10 11 12 13 14 15 16 17 18 19 20 21 470.2 470.6 471.0 471.4 471.8 472.2 472.6 473.0 473.4 473.8 474.2 474.6 475.0 475.4 475.8 476.2 476.6 477.0 477.4 477.8 22 478.2 478.6 479.0 479.4 479.8 480.2 480.6 481.0 481.4 481.8 482.2 482.6 483.0 483.4 483.8 484.2 484.6 485.0 485.4 485.8 23 486.2 486.6 487.0 487.4 487.8 488.2 488.6 489.0 489.4 489.8 490.2 490.6 491.0 491.4 491.8 492.2 492.6 493.0 493.4 493.
A10-TX-US User Guide - 26 -