A10-TX-US Digital Transmitter — User Guide —
A10-TX-US User Guide Copyright / Doc Rev History Info Model A10-TX-US only. See separate documentation for A10-TX model. Copyright © 2022 Sound Devices. All rights reserved. Revision Date Description 1A Dec 2017 Initial Publication 1B Feb 2018 Added note re: Bluetooth remote range 1C Apr 2018 Edits made in sections: Specifications and Certifications 1D May 2018 Added v1.05 change (i.e. Orientation setting) 1E (2A) July 2018 Added v2.
A10-TX-US User Guide Overview • Low-noise, studio-grade balanced input for microphones and line level inputs with analogue limiter and 48 V phantom power. • State-of-the-art 100% digital long-range modulation delivers the longest transmission distance of any system on the market. • Standard and long-range modulations offer full bandwidth (10 Hz – 20 kHz), ultra-low distortion, and high dynamic range.
A10-TX-US User Guide System Quickstart The A10 Digital Wireless System is easy to use. Follow the steps below for basic setup and operation. At the Receiver 1. Fit the included straight and right-angled antennas to the A10-RX receiver. 2. Connect the receiver to a power source. It will immediately power on. 3. Using the scanning tool in the Selection menu find an available open frequency. If multiple wireless systems are in use, make certain to keep frequencies least 400 kHz apart. 4.
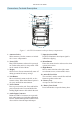
A10-TX-US User Guide Connectors, Controls Description 1 6 2 7 3 8 4 9 5 11 10 12 Figure 1: A10-TX-US transmitter with open battery compartment 1 - Antenna Socket SMA connector, 50 ohm, connects to included 1/4-wave whip antenna. 7 - Input Overload LED Red LED illuminates when input signal is 3dB before clipping. 2 - Power LED Blue LED illuminates when unit is powered on. Flashes when unit is in sleep mode. LED can be turned off in the Menu. 8 - Menu Button Enters the menu selection.
A10-TX-US User Guide Powering The A10-TX-US is powered by two AA (LR6) batteries. For the longest runtime use Lithium primary cells. The transmitter also accepts alkaline primary and Nickel Metal Hydride rechargeable batteries. Select the battery type used in the menu to ensure that the battery condition is indicated accurately in both the transmitter display and receiver. 1. Open the battery compartment by pressing both mechanical releases simultaneously. (See Figure 1.) 2.
A10-TX-US User Guide Menu Control and Menu Selections The A10-TX-US transmitter is controlled through its menu. Enter the menu via the centre Menu button. Once in the menu the Left and Right buttons toggle among options, and the Menu button makes the selection. The Menu Lock feature on the A10-TX-US provides a way to lock the buttons. Press and hold the Power button while holding the Right button to lock/unlock access to menu settings.
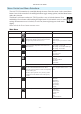
A10-TX-US User Guide Audio Setup Menu Selections Icon Description Options Exit Returns to the main menu. Low Cut Activates a low frequency cut filter to the audio input. 18 dB/octave. • Off • 40 Hz • 60 Hz • 80 Hz • 100 Hz • 200 Hz Limiter The limiter reduces peak levels of the analogue audio input before digital conversion to prevent audio overload. The recommended setting is On. • On • Off Lav / Mic / Line Selects the input type at the LEMO-3 connection.
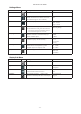
A10-TX-US User Guide Settings Menu Selections Icon Description Options Exit Returns to the main menu. Bluetooth Toggles Bluetooth On or Off. Bluetooth offers external control of the A10-TX-US via the A10TX-US Remote App (for iOS or Android). • On • Off RF Power Sets the RF output power of the transmitter. • Low - 10 mW • Med - 20 mW • High - 50 mW Modulation Selects Standard or Long Range Modulation.
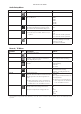
A10-TX-US User Guide System Menu Selections Icon Description Options Exit Returns to the main menu. Sleep When selected, the A10-TX-US goes into low-power Sleep • Sleep mode. The blue LED flashes when the unit is in a sleep state. The unit returns to normal power operation when any button is pressed or the transmitter is activated from the A10-TX-US Remote App. Lock Menu Activates a button lock to prevent unintentional changes to menu selections.
A10-TX-US User Guide ª Remember, for a given channel / sub channel, the actual frequency will change depending on the TV Channel Mapping setting. The frequency is displayed with an asterisk (*) when the tune value does not fall within the preallocated sub channel. See the Frequency Tables in this guide for a complete list of frequencies corresponding to the channel and sub channel selections. Modulation Modulation can be set to Standard (Std) or Long Range (LR) in Menu > Settings > Modulation.
A10-TX-US User Guide Mute Button When the Mute Button function is enabled, holding the Left button for 1 second toggles Mute on or off. While Muted, the transmitter LED flashes red. The paired Receiver channel display Muted on the channel screens. Audio is muted at the transmitter input, this means both recorded and transmitted audio will be silent. Antenna The SMA antenna connector is used to mount the included 1/4-wave whip antenna. The use of any other type is forbidden.
A10-TX-US User Guide Timecode and Time-of-Day Clocks The A10-TX-US includes high-precision internal clocks to maintain time-of-day/date and SMPTE timecode. These clocks run continuously when AA batteries are in the unit and draw negligible current (less than 1 uA). The A10-TX-US design incorporates a supercapacitor to power the time-of-day clock for several days in the absence of batteries. The supercapacitor reaches full charge when batteries have been in the unit for five minutes.
A10-TX-US User Guide Remote Control The A10-TX-US can be remotely controlled from an Android or iOS device running the A10TX-US Remote app. The app is available as a free download from the Google Play store and iOS App store, respectively. With the A10-TX-US Remote app, you can: 1 - Change the transmitter’s name; the serial number is used at default. When using User Groups, the user name is displayed.
A10-TX-US User Guide User Groups The User Groups feature allows for easy, intuitive naming of specific frequencies for each A10 transmitter used on set, and grouped together for faster tuning. The operator of an A10 receiver may then easily switch between transmitters by choosing alphanumeric names, such as “Jack” and “Jill”, instead of having to remember and manually tune to different, specific4numerical frequencies.
A10-TX-US User Guide SD-Utility supports the creation of up to eight user groups, each with a max of 32 users, per Audio Limited User Group (ALUG) file. To add additional user groups: 1. In SD-Utility, select Add Group. 2. Name the new group and select the band of frequencies for the group. 3. Add users (defining name and frequencies) to the group. Audio Limited User Group files (ALUG) may be saved for future use and modification.
A10-TX-US User Guide 6. Use the left and right buttons to navigate through the available User Groups. Press the centre button to select and load the user group. With a user group loaded, the transmitter’s Frequency control changes between different users in the group and their pre-assigned frequencies. To dial in a specific user (and its frequency): 1. Press the center Menu button on the transmitter. 2. Select Frequency. 3.
A10-TX-US User Guide SD-Utility File Conversion Sound Devices SD-Utility is a companion application for MacOS and Windows. This application can be used to process MIC files recorded by the A10-TX into standard Broadcast WAV files. The application offers various export options to suit to the given workflow. A10-TX MIC files can be renamed, snipped by timecode values, conformed to a CSV Sound Report, exported as WAV, and more.
A10-TX-US User Guide Importing Files into SD-Utility SD-Utility accepts monophonic WAV and RF64 WAV files recorded by the A20-Mini or MIC files recorded by the Audio Ltd A10-TX. There are three methods for importing files into SDUtility. • Drag-and-drop WAV or MIC files or volumes/folders containing MIC and/or WAV files into the Source window. • Navigate File > Add and select MIC and/or WAV file(s) for import.
A10-TX-US User Guide Creating Shorter WAV Files Based on Timecode Range When a shorter WAV file is needed than the original recording, you can use the Timecode Range feature to create a shorter WAV file. The length and content of the exported file is based on the entered timecode start and stop times. 1. Highlight the source file(s) from the Source window. 2. Select the Timecode Range check box. 3. Enter valid timecode start and end times. The values must fall within the range of the source file. 4.
A10-TX-US User Guide Specifications A10 U.S. Digital Wireless System Frequency Range 470–608 MHz Transmitter Switching Bandwidth U.S. Only Models A10-TX-US-AU (470–548 MHz) A10-TX-US-BU (518–608 MHz) Modulation Mode Proprietary digital RF modulation Standard or Long Range, selectable Digital Audio Codec Audio Ltd.
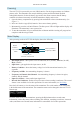
A10-TX-US User Guide Input Connector Wiring Diagram The A10-TX-US LEMO input connector accepts numerous input types. Select the input type in the Selection Menu before connecting an audio source.
A10-TX-US User Guide Certifications FCC Conformity The A10-TX-US transmitter complies with the following requirements: FCC (Federal Communications Commission) Part 74 Operation is subject to the following two conditions: (1) This device may not cause harmful interference, and (2) This device must accept any interference received, including interference that may cause undesired operation. Changes or modification not expressly approved. A10-TX-US frequency ranges supplied for use in USA: • 470.2–547.
A10-TX-US User Guide Frequency Tables The A10-TX-US offers preselected frequencies based on channels and sub channels. X Frequencies (6 MHz Per TV Channel) The chart below shows all frequencies available for the A10-TX-US transmitter. Sub Channel Channel 1 2 3 4 5 6 7 8 9 10 11 12 13 14 15 14 470.2 470.6 471 471.4 471.8 472.2 472.6 473 473.4 473.8 474.2 474.6 475 475.4 475.8 15 476.2 476.6 477 477.4 477.8 478.2 478.6 479 479.4 479.8 480.2 480.6 481 481.4 481.8 16 482.2 482.
A10-TX-US User Guide Y Frequencies (7 MHz Per TV Channel) Sub Channels Channels 1 2 3 4 5 6 7 8 9 10 11 12 13 14 15 16 17 22 485.3 485.7 486.1 486.5 486.9 487.3 487.7 488.1 488.5 488.9 489.3 489.7 490.1 490.5 490.9 491.3 491.7 23 492.3 492.7 493.1 493.5 493.9 494.3 494.7 495.1 495.5 495.9 496.3 496.7 497.1 497.5 497.9 498.3 498.7 24 499.3 499.7 500.1 500.5 500.9 501.3 501.7 502.1 502.5 502.9 503.3 503.7 504.1 504.5 504.9 505.3 505.7 25 506.3 506.7 507.1 507.5 507.9 508.3 508.
A10-TX-US User Guide Z Frequencies (8 MHz Per TV Channel) Sub Channels 1 2 3 4 5 6 7 8 9 10 11 12 13 14 15 16 17 18 19 20 21 470.2 470.6 471.0 471.4 471.8 472.2 472.6 473.0 473.4 473.8 474.2 474.6 475.0 475.4 475.8 476.2 476.6 477.0 477.4 477.8 22 478.2 478.6 479.0 479.4 479.8 480.2 480.6 481.0 481.4 481.8 482.2 482.6 483.0 483.4 483.8 484.2 484.6 485.0 485.4 485.8 23 486.2 486.6 487.0 487.4 487.8 488.2 488.6 489.0 489.4 489.8 490.2 490.6 491.0 491.4 491.8 492.2 492.6 493.0 493.4 493.
Post Office Box 576 E7556 State Rd. 23 and 33 Reedsburg, Wisconsin 53959 USA support@sounddevices.com +1 608.524.0625 main 800.505.0625 toll free (U.S. only) www.sounddevices.