
Installation Guide
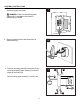


7.
Attach fixture (A) to mounting plate (B) using
the mounting plate screws (C) previously
removed (Step 3, Page 5).
NOTE: Before tightening mounting plate
screws (C) completely, use level (not included)
to check fixture (A) -- adjust if necessary.
NOTE: Fixture (A) can be installed with the
sockets facing either up or down.
8.
Remove socket ring (D) from socket of
fixture (A). Attach shade (sold separately)
to socket, securing with socket ring (D).
Repeat for remaining sockets.
WARNING: Do not overtighten socket
ring (D) as shade may crack or break.
ASSEMBLY INSTRUCTIONS
7
6.
Wrap electrical tape (not included) around
each individual wire connector (AA) down
to the wire. Push wire connectors (AA)
gently back into outlet box. Carefully push
excess wiring into outlet box.
WARNING: Make sure no bare wire or
wire strands are visible after making
connections.
CC
A
CC
7
8
Shade
[sold
separately]
6
A
AA
AA
AA
D
A
D
A