
Installation Guide


13
STYLE SELECTIONS
TM
LOCKING ENGINEERED HARDWOOD FLOORING —
VERTICAL ACCENT WALL INSTALLATION INSTRUCTIONS
2018_06_SS_LEWF_LOW_INST_WAR
Measure the length of your locking engineered hardwood plank and the length of the wall area to determine the total
square footage area. Order that amount of flooring plus an additional 10% for incorrect cuts.
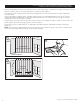
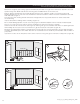
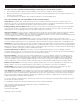
Remove all base and trim from accent wall. Measure from the floor a distance equal to your locking engineered
hardwood plank plus one inch then level and mark the wall with a chalk line. With an electronic stud finder locate and
mark wall studs. (Figure 1)
Turn off power while working around wall outlets and light switches. Pay special attention to avoid contact with
electrical wiring.
Inspect each plank for damage before installing. (Figure 1a)
Do not install damaged planks. You can use locking engineered hardwood planks with or without an attached pad.
There is no need to remove the pad, so treat the installation the same for both types of planks.
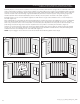
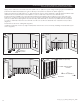
Start from the left side with the short side tongue up and long side groove toward the wall. Place one plank against the
wall and align at the top to test fit. You will want a 1" gap at the bottom of the plank. (Figure 2a)
Determine the appropriate number of vertical planks to fill the wall. For the best appearance, the first and last planks
should be approximately the same width. Cut them as needed based on the width of your installation and the width of
your planks.
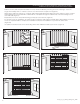
If you don’t need to cut the first plank, remove lower extension of long side groove with saw or utility knife. (Figure 2b)
55"
54"
1
Level Line
1" Gap
1a
2a
1" Gap
Install
towards
wall
after
before
Cut off
extension
2b