
Installation Guide


12
STYLE SELECTIONS
TM
LOCKING ENGINEERED HARDWOOD FLOORING —
VERTICAL ACCENT WALL INSTALLATION INSTRUCTIONS
2018_06_SS_LEWF_LOW_INST_WAR
Although originally designed as a durable floor covering, many consumers have started using locking engineered
hardwood flooring on walls to give their rooms more character and to create a feature or accent wall.
Locking engineered hardwood can be utilized as a decorative covering over an existing clean, dry, secure and vertical wall
that meets building codes. The wall substrate should be primed or painted drywall (gypsum board) only. Do not install
directly over wallpaper or paneling. Locking engineered hardwood is not intended to be used on ceilings, countertops or
as any type of structural material.
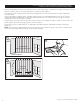
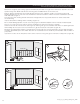
The installation wall should only run vertical to the floor. Sloping walls and surfaces that are parallel to the floor, such as
ceilings or soffits, should not be selected. Limit installations to a maximum of 40 feet in length and a maximum of 1 plank
length in height.
Locking engineered hardwood is suitable for an accent wall when used in climate controlled (35-55% RH and 60-80° F)
indoor installations only. Acclimate unopened product lying flat in the room where it is to be installed for at least 48 hours.
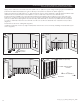
Mix planks from different cartons as you install to maximize the natural appearance.
Check wall for moisture, visible water stains or leaking windows. Do not install locking engineered hardwood over a wall
with known moisture damage. Do not install in areas near water sources such as a backsplash over a sink or bathtub.
Acceptable job site conditions, including relative humidity and wall moisture conditions, must be maintained throughout
the life of the locking engineered hardwood application.
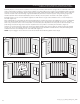
Check wall for flatness within
3
/16" over 10 feet. Correct any unevenness before installing to allow the locking engineered
hardwood planks to lie flat without rocking.
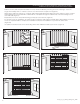
The following requirements are not intended to supersede federal, state or local building codes, but as with many other
interior finish products, may require modifying existing structural components for successful installation. Owner assumes
responsibility for compliance with all building codes, including maintaining the required distance from heat sources such
as fireplaces.
WARNING: For a safe and secure installation, this product MUST be installed in accordance with these installation instructions.
Tools Required for Installation:
• Caulk gun
• Utility knife
• Stud finder (electronic)
• Carpenters level or laser level
• Chalk line
• 18 gauge brand nail guin (electric or air)
• Tape measure
• Pencil
• Screw gun or drill driver
• Safety glasses
• Dust mask
• Gloves
Materials Required for Installation:
• 1
1
/
2
" - 1
3
/
4
" brad nails
• 100% silicone adhesive caulk (clear)
Other Tools and Materials:
• Hammer
• Uniclic
®
appropriate tapping block
• Pull bar
• Saw for cutting locking engineered hardwood planks
• Pry bar (for removing existing base or trim)
• Chair rail, wall base and quarter round moldings
(to fame out accent wall)