
Installation Guide


11
STYLE SELECTIONS
TM
LOCKING ENGINEERED HARDWOOD FLOORING —
HORIZONTAL ACCENT WALL INSTALLATION INSTRUCTIONS
2018_06_SS_LEWF_LOW_INST_WAR
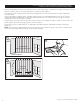
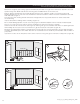
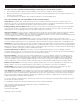
Plank 2 of row 2 (and each plank thereafter in row 2) will be modified by removing the short end tongue. Score the
tongue with a utility knife 3 – 4 times to remove. You will now have a square end. (Figure 6)
Apply silicone adhesive caulk in an “S” pattern and install modified boards by tilting into place. Tighten joints as needed
with a tapping block or pull bar. Drive a brad nail into each plank through the shallow area of the extended groove at
each wall stud. (Figure 7)
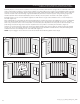
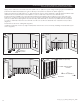
Repeat this process for each plank working your way up to the last row. (Figure 8)
For the last row of the installation, use painters tape to mark the stud location for brad nailing. Cut all planks in the last
row to the required width to complete the installation. Complete the installation as you have the earlier rows.
(Figure 8a)
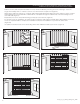
Use quarter round for inside corners and ceiling. Finish with wall base board of your choice. (Figure 9)
remove
6
Plank 3 Row 2
7
8
8a
9
Quarter round
Wall base
Quarter round
Quarter round