
Installation Guide


9
Lowes.com
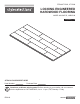
FLOATING INSTALLATION INSTRUCTIONS
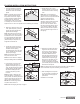
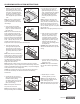
1.Usewoodwedges(notincluded)
tocreatea3/8in.expansiongap
between the walls and installed
planks.
Note:
An expansion space of at least
3/8in.mustbemaintainedaround
the perimeter of the room, all pipes,
counters,cabinets,replacehearths,
doorframesandanyotherxed
verticalobjectsintheroom.Doorway
or archways 48 in. or less and rooms
largerthana26ft.x33ft.arerequiredtohaveaT-Molding(notincluded).
2. Beginning in left hand corner of the
room,placerstplank(A)withthe
tonguesidefacingthewallrmly
against the wood wedges.
Note: Often walls are not structurally
square.Planksinrstrowmayneedto
be scribed and cut to contour with the
wall. It is important that planks follow
wall. Mark plank with a scribing tool
(followtheshapeofwall)thencutit
lengthwise to follow the line.
3.Overlaptheendjointofsecond
plank(A)ontotheonepreviously
installed. Continue placing
succeedingplanks(A)inthesame
way to complete row. Cut the last
plank(A)accordingly.
Note: Thelastplankoftherstrow
mayhavetobecuttosize.
Note: Ensuretherstrowisstraight
before proceeding with the installation.
4.Forrstplank(A)ofsecondrow,
alignthesideofnewplank(A)
againsttherstplank(A)inrow1.
Then,settapingblock(notincluded)
againstplank(A)andtapitlightly
with rubber mallet against the
previouslylaidplank(A)untilit
is secure.
Note: Endjointsonadjoiningrows
should be offset by no less than 6 in.
When possible, use leftover plank from
therstrowtobeginthesecondrow.
If the cut piece is shorter than 6 in.,
DO NOT use. Instead, begin with a
new plank that exceeds 6 in.
Note:Refertothetappingblocktipsonpage6.
5.Repeatsteps3and4forthe
remainingplanks(A)intherestof
the second row and the remaining
rows
Note: Move rows if necessary to
ensuretherearenoundesirablejoint
patterns.Therow’sendjointsshouldbe
randomthroughouttheoor.
Note:Therstthreerowsare
staggered, ensuring offset of previous
rowwithendjointsarenocloser
than 6 in. from one another. When
the planks are being tapped in place,
a non-random pyramid or stair step
pattern is used to ensure the planks
remain engaged through the force of
the tapping.
6.
Most often, the width of the entire
length of the last row will need to
be cut so it is narrow enough to
ttheremainingspace.Measure
thedistancebetweentheoor
faceedge(excludethetongue)to
thewall.Subtract3/8in.fromthis
measurement for expansion gap.
Drawalineontheplanks(A).Cut
theplanks(A)
using an electric
circularsawwithnishsawblades
(notincluded)
along the marked line.
Discard the excess pieces.
Note: The blade should cut into the face of the board to prevent splinters.
Care must be taken to prevent scratching the face of planks.
7. When installing last row of planks
(A),useapullbar(notincluded)to
drawthelastrowtottightlyinto
previous row.
Installation is now complete.
2
Tongue
1
Wood
Wedge
3/8 in.
3/8 in.
2
1
4
Tapping block
3
3
1
2
1
6 in. minimum
end joint stagger
6 in. minimum
end joint stagger
5
Tapping block
1
3/8 in.
6
2
1
7