
Installation Guide


6
Lowes.com
BEFORE YOU BEGIN
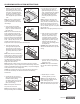
When tapping the planks together, the following process works best:
•Usingatappingblockwitharubbermallet,lightlytapeachpieceuntiltheplanklaysat.DO NOT FORCE THE PLANKS DOWN FLAT. Start tapping
in the plank at the opposite end along the length, working from left to right and making sure the plank fully engages as you progress down the length.
•Whenendjointisslidintoplaceontheprecedingplank,raisetheplanknowbeinginstalledtoanapproximate45°anglewhilesettingthesidejointinto
place.
•Whenyouhavetheplankinplace,lowertheplankwhiletappingituntilplankislyingatandlockedinplace.
•Theinitialrows,whenyouarenotagainstarmstartingstructure,mayseemmoredifculttoengagethanthefollowingrows.
•Thetappingblockisneededtodistributeequalforceacrossthetonguewithoutanydamage.Forbestresults,slidethetappingblockalongthesuboor
and row, tapping lightly with a rubber mallet, while using tapping strokes to engage the locking system. If the planks will not go together, check to see if the
planksaremovingagainstthewallwiththestrikes.Ifso,adjustwoodwedgestormuporusethefasten-downmethodinstead
.
Beforebeginninginstallationofproduct,makesureallnecessarymaterialsaregatheredand/orpurchased.
Estimated Installation Time:Variesbasedonsizeofjobsiteaswellasinstaller'sskilllevel.
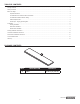
Safety glasses, NIOSH-approveddustmask,wood/concretemoisturemeter,broomorvacuum,chalk
line,startingrowwedges,tappingblock,prybarortrimpuller,tapemeasure,pencil,jambsaw,mitersaw,tablesaw,utilityknife,appropriateadhesive,
trowel,woodwedges,coordinatingstain,llerorputty,plasticscraper.
Accessories Needed: 15lb.feltorrosinpaper,ooringadhesive,coordinatingtransitionstripsormolding,approvedhardwoodooringcleaner
recommended by the manufacturer.
For All Types of Installations
Undercutalldoorcasings1/16in.higherthanthethicknessoftheooringmaterialsbeinginstalled.Todothis,useascrappieceofooringasaguide.
Layitonthesubstrateandcutthecasingwithahandsaworuseapowerjambsawsetatthecorrectheight.Removeallmoldingsandwall-base,and
undercut all door casings.
• DO NOT installooringifmoisturetestsresultsexceedrecommendedlimits.
•Planyourlayoutanddeterminethedirectionoftheinstallationintheroom.Planksinstalledparalleltowindowsaccentthehardwoodbest.
•Blendingofcartons:Toachieveauniforminstallationappearance,preselectandsetasidehardwoodplanksthatblendbestwithalltrimsandmoldings.
Install these planks next to best blended moldings.
•Removeallwallmountedmoldingssuchasbaseandquarterround.
•Floorshouldbeinstalledblendingplanksfromseveralcartonstoensuregoodcolorandshademixturethroughouttheinstallation.
•Beattentivetostaggeringtheendsoftheboardsatleast4-6in.whenpossible,inadjacentrows.
•DO NOT usearubbermalletwithoutatappingblocktoinstallooring.Strikingthesurfacewitharubbermalletmay“burn”thenishcausingirreparable
damage.
Floating Installation
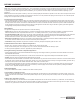
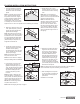
•Underlaymentrequirementsareverycriticaltoaoatinginstallation.Excessivepadcompressionorcompactionisa
commoncauseofseamfailure.Laytheunderlaymentontheoorwiththemoisturebarrierfacingup.Thedirection
oftheunderlaymentshouldbeparalleltothedirectionoftheoorbeinginstalled.Fortherstrowofooring,the
underlayment should be placed so that approximately 1 in. overlaps onto all perpendicular walls. Place the following
rownexttotherstrowontopofthelowermoisturebarrieroverlap.Makesuretheunderlaymenttstogethertightly
(don’tleavegaps).Onthelastrow,placetheunderlayment1in.upthewall.Tojoinrollsontheshortsideofthe
underlayment, use a moisture resistant tape to connect the 2 pieces so water cannot penetrate the underlayment.
PREPARATION
1
1 in.
Direction of floor
1 in.
Moisture
Barrier Side