
Installation Guide

12
Lowes.com
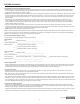
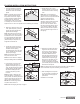
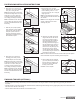
6.Blindnailata45˚anglethrough
the tongue 1 to 2 in. from ends and
every 4-6 in. along the side.
Note: Pre-drill the holes in the tongue
to make blind nailing easier. Or, a brad
nailerwith1to1-3/8in.brads(not
included)canalsobeusedtoblind
nail, making pre-drilling unnecessary.
Note: Countersink the nails. Place the
nails in a dark grain spot in the board.
Fillwithawoodllerthatblendswith
theooring.
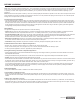
7.Withendjointinproperposition,
holdnextplank(A)tobeinstalled
atabouta45°angleandsetthe
sidejointinplace.Lowerthe
plank(A)whiletappingwiththe
tappingblockuntilplank(A)islying
atandlockedinplace.
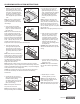
8.Blindnailata45˚anglealong
the edge groove every 4 to 6 in.
Repeatsteps5-7forrst3rows.
Note: Pre-drill the holes in the tongue
to make blind nailing easier. Or, a brad
nailerwith1to1-3/8in.brads(not
included)canalsobeusedtoblind
nail, making pre-drilling unnecessary.
Note: Countersink the nails. Place the
nails in a dark grain spot in the board.
Fillwithawoodllerthatblendswith
theooring.
9.Repeatsteps5and7toinstall
remaining planks in rows. Secure with
bradsornishingnails1in.to2in.
from ends and every 4-6 in. along the
edge of grooves.
Note:45˚blindnailing(doneinstep6)
isnotnecessaryaftertherstthreerows
are installed.
Note: Be sure to stagger ends of boards
correctlyinadjacentrowstoavoid
clusteringendjoints.
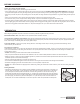
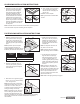
10. Most often, the width of the entire
length of the last row will need to
be cut so it is narrow enough to
ttheremainingspace.Measure
thedistancebetweentheoor
faceedge(excludethetongue)to
thewall.Subtract3/8in.fromthis
measurement for expansion gap.
Drawalineontheplanks(A).Cut
theplanks(A)usinganelectric
circularsawwithnishsawblades
(notincluded)alongthemarkedline.
Discard the excess pieces.
Note: The blade should cut into the face of the board to prevent splinters.
Care must be taken to prevent scratching the face of planks.
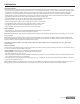
11. When installing last row of planks
(A),useapullbar(notincluded)to
drawthelastrowtottightlyinto
previous row. Secure plank with
nishingnailsorbrads.
Installation is now complete.
6 in. minimum
end joint stagger
6 in. minimum
end joint stagger
9
4-6 in.
1-2 in.
1
3/8 in.
10
2
1
11
FASTEN-DOWN INSTALLATION INSTRUCTIONS
3
1
2
1
7
Tapping block
6
4-6 in.
1-2 in.
8
4-6 in.
•Installthepropertrimmoldingatthedoorwaystoachievethetransitionandalongthewallstocovertheedgesofanygapsalongthewalldueto
irregularity.
•Completethejobbyusingthewoodllerthatcoordinateswiththeinstalledengineeredooringtollanygappingalongthejointsorareaswherebrad
nailswereusedinthetrimortheooring.
•Cleanthenishedoorwithmanufacturerreccommendedcleaner.
FINISHING TOUCHES (OPTIONAL)