
Installation Guide

11
Lowes.com
GLUE-DOWN INSTALLATION INSTRUCTIONS
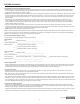
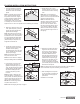
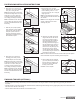
9. Most often, the width of the entire
length of the last row will need to
be cut so it is narrow enough to
ttheremainingspace.Measure
thedistancebetweentheoor
faceedge(excludethetongue)to
thewall.Subtract3/8in.fromthis
measurement for expansion gap.
Draw a line on the planks. Cut the
planks using an electric circular saw
withnishsawblades(notincluded)
along the marked line. Discard the
excess pieces.
Note: The blade should cut into the face of the board to prevent splinters.
Care must be taken to prevent scratching the face of planks.
10. When installing last row of planks,
useapullbar(notincluded)to
drawthelastrowtottightlyinto
previous row.
Installation is now complete.
Note:Lightfoottrafcisallowedafter
12 hours
1
3/8 in.
9
2
1
10
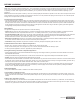
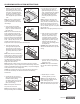
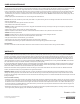
1. Measure out from the ends of your
starting wall the width of the plank
(A)plus3/8in.forexpansionand
mark both ends. Where possible lay
theooringat90°anglestotheoor
joists.
Note:Expansionspaceisrequired
alongtheperimeterofroom(s)of
intended installation; expansion space is
dictated by the thickness of the product.
Product
Expansion Space
3/8in.oortile 3/8in.
1/2in.oortile 1/2in
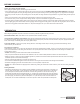
2. Beginning in left hand corner of
theroom,placeplank(A)withthe
tongue side facing the wall against
the marked line.
3.Blindnailata45˚anglethroughthe
tongue 1 to 2 in. from ends and every
4-6 in. along the side.
Note: Pre-drill the holes in the tongue
to make blind nailing easier. Or, a brad
nailerwith1to1-3/8in.brads(not
included)canalsobeusedtoblindnail,
making pre-drilling unnecessary.
Note: Countersink the nails. Place the
nails in a dark grain spot in the board.
Fillwithawoodllerthatblendswith
theooringinstalledifnoshoemoldingisused.Ifbaseorshoemolding
will be used it will cover the nails when installed after completion of
the installation.
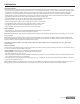
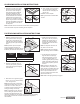
4.Overlaptheendjointofsecond
plank(A)ontotheonepreviously
installed.Secureplank(A)asin
previous step. Continue placing
succeeding planks and secure to
complete row.
Note:Thelastplankoftherstrow
mayhavetobecuttosize.
Note:Ensuretherstrowisstraight
before proceeding with the installation.
5.Forrstplank(A)ofsecondrow,
alignthesideofnewplank(A)
againsttherstplank(A)inrow
1. Then, set tapping block (not
included)againstplank(A)andtap
it lightly with rubber mallet against
thepreviouslylaidplank(A)untilit
is secure.
Note: Endjointsonadjoiningrows
should be offset by no less than 6 in.
When possible, use leftover plank from
therstrowtobeginthesecondrow.
If the cut piece is shorter than 6 in.,
do not use. Instead, begin with a new
plank that exceeds 6 in.
Note: Refertothetappingblocktipsonpage6.
FASTEN-DOWN INSTALLATION INSTRUCTIONS
2
Tongue
4
3
4-6 in.
1-2 in.
Tongue
Wall
1
Starting wall
Expansion
Space
Expansion
Space
Expansion
Space
2
1
5
Tapping block