
Installation Guide


10
Lowes.com
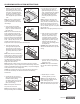
GLUE-DOWN INSTALLATION INSTRUCTIONS
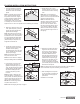
1. Measure out from wall the width
oftwoplanksplus3/8in.forthe
expansion gap and mark each end
of the room. It is recommended
you start the installation along an
exterior wall, as it is more likely
tobestraightandsquarewiththe
room.
Note: Use board or spacers during
installation to maintain expansion
spaceofatleast3/8inandtokeep
rows straight.
2.Usingatrowel(notincluded),
spread necessary adhesive (see
pages11-12)frommarkedlineto
the starter wall.
Note:Useofacorrecttrowelata45°
angle is imperative to achieve the
proper spread of the adhesive, which
creates a proper bond; an improper
bond can cause loose or hollow spots.
Make sure to change the trowel every
2,000-3,000sq.feet(orsooner,as
needed)astheweardownofthe
dimples will cause an improper spread of the adhesive.
3.Placetherstplank(A)with
the tongue side facing the wall,
ensuringthereis100%contact
betweentheplank(A)andadhesive
bypressingdownrmlyonplank
(A).
Note: Often walls are not structurally
square.Planksinrstrowmayneedto
be scribed and cut to contour with the
wall. It is important that planks follow
wall. Mark plank with a scribing tool
(followtheshapeofwall)thencutit
lengthwise to follow the line.
Note: Alignment is critical and can be achieved by securing a straight
edgealongthelineorbytopnailingtherstrowwithnishingnails(wood
suboor)oradjustablespacers(concretesuboor).Thispreventsslippage
of the planks that can cause misalignment.
Caution: Any adhesive that comes in contact with face of plank should
be removed immediately. Use adhesive remover recommended by
manufacturer.
4.Overlaptheendjointofsecond
plank(A)ontotheboardpreviously
installed. Continue placing
succeedingplanks(A)inthesame
way to complete row. Cut the last
plank(A)accordingly.
Note:Thelastplankoftherstrow
mayhavetobecuttosize.
Note:Ensuretherstrowisstraight
before proceeding with the installation
5.Forrstplank(A)ofsecondrow,
alignthesideofnewplank(A)
againsttherstplank(A)inrow1.
Then,settapingblock(notincluded)
againstplank(A)andtapitlightly
with rubber mallet against the
previouslylaidplank(A)untilitis
secure.
Note:Endjointsonadjoiningrows
should be offset by no less than 6 in.
When possible, use leftover plank from
therstrowtobeginthesecondrow.
If the cut piece is shorter than 6 in., do
not use. Instead, begin with a new plank
that exceeds 6 in.
Note:Refertothetappingblocktipsonpage6.
6.Holdnextplank(A)tobeinstalled
atabouta45°angleandsetthe
sidejointinplace.Placetongue
intogrooveofplank(A)orstrips
andpressrmlyintoadhesive.Use
tappingblocktotplanks(A)snug
together at side and butt ends.
Continue placing succeeding planks
to complete row.
CAUTION: Never slide planks through
adhesiveandNEVERworkontopofthe
ooring.
7. Once the starter rows are secure,
spread2–1/2to3ft.ofadhesivethe
length of the room.
CAUTION: Never lay more adhesive
than can be covered in approximately
1 hour.
8.Repeatsteps5-7toinstall
remainingplanks(A)inrows.
Note: Be sure to stagger ends of
plankscorrectlyinadjacentrowsto
avoidclusteringendjoints.
Note: If the last plank of a row is a full
plank, cut off the lower drop lock end.
1
Starting wall
3/8 in.
3/8
in.
3/8in.
2 plank width
2 plank width
2
Glue area
Wood
Wedge
3
Tongue
4
2
1
5
Tapping block
3
1
2
1
6
Tapping block
Glue area
7
8
6 in. minimum
end joint stagger
6 in. minimum
end joint stagger