ITEM #0772303, 0772308 LOCKING ENGINEERED HARDWOOD FLOORING MODEL #LUO45-78, LUB25-98 Español p. 14 ATTACH YOUR RECEIPT HERE Serial Number Purchase Date Questions, problems, missing parts? Before returning to your retailer, call our customer service department at 1-877-888-8225, 8 a.m. - 8 p.m., EST, Monday - Friday. EB1618 1 Lowes.
TABLE OF CONTENTS Package Contents........................................................................................................................................................................................ 2 Safety Information........................................................................................................................................................................................ 3 Before You Begin......................................................................
SAFETY INFORMATION Please read and understand this entire manual before attempting to assemble or install the product. WARNING: Wood Dust • Cutting, sanding or machining wood products produces wood dust. While wood products are not hazardous under the OSHA Hazard Communication Standard (29 CFR 1910.1200), the International Agency for Research on Cancer (IARC) and the state of California have classified wood dust as a human carcinogen. • Airborne wood dust can cause respiratory, skin and eye irritation.
BEFORE YOU BEGIN Pre-Installation and Jobsite Conditions Acclimation • Manufacturer requires engineered hardwood products to be acclimated for a minimum of 48 hours prior to installation. Acclimation allows flooring to achieve equilibrium moisture content (EMC) with the installation environment. All wood continually expands and contracts until it reaches moisture equilibrium with the environment in which it’s installed.
BEFORE YOU BEGIN Note: When joist spacing exceeds the traditional 16 in. center, manufacturer recommends you apply a thin bead of tongue groove glue to the bottom side of the groove to lock the tongue and groove profile in place. This will reduce the potential for movement of the tongue and groove, which may contribute to squeaking or crackle. When using this method of installation, you may continue to choose to staple or nail down the hardwood, depending on your preference.
BEFORE YOU BEGIN General Tips–Tapping the Planks Together When tapping the planks together, the following process works best: • Using a tapping block with a rubber mallet, lightly tap each piece until the plank lays flat. DO NOT FORCE THE PLANKS DOWN FLAT. Start tapping in the plank at the opposite end along the length, working from left to right and making sure the plank fully engages as you progress down the length.
PREPARATION Glue-down Installation • Make sure the floor covering materials are well bonded to the subfloor/underlayment with full spread adhesive and no more than two layers thick, not to exceed 3/16 in. With approved wood/wood composite sub-floors, if vinyl or tiles are loose, broken, or in poor condition, install a 3/8 in. approved subfloor panel directly over the flooring materials. Clean the flooring materials as necessary to remove waxes, sealers or cleaning residues to allow a good adhesive bond.
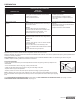
PREPARATION ADHESIVE SELECTION GUIDELINES ADHESIVE TYPE SUBFLOOR REQUIREMENTS USES Low VOC saline terminated polymer adhesive Concrete: • Above grade concrete substrates where excessive moisture may be present • Floor pH must not exceed 11 • For protection from concrete moisture up to 95% RH • Sound reduction in multi-story buildings • Crack suppression for in plane cracks up to 1/8 in.
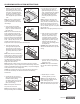
FLOATING INSTALLATION INSTRUCTIONS 5. Repeat steps 3 and 4 for the remaining planks (A) in the rest of the second row and the remaining rows 1 in . Wood Wedge 3/ 8 8 3/ . in 2 Note: The first three rows are staggered, ensuring offset of previous row with end joints are no closer than 6 in. from one another. When the planks are being tapped in place, a non-random pyramid or stair step pattern is used to ensure the planks remain engaged through the force of the tapping.
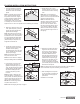
GLUE-DOWN INSTALLATION INSTRUCTIONS in . 3/ 8 k an pl th id w n. 8i 3/ Wood Wedge 3 Tapping block Note: Refer to the tapping block tips on page 6. ar ea 6. Hold next plank (A) to be installed at about a 45° angle and set the side joint in place. Place tongue into groove of plank (A) or strips and press firmly into adhesive. Use tapping block to fit planks (A) snug together at side and butt ends. Continue placing succeeding planks to complete row. Gl ue 3.
GLUE-DOWN INSTALLATION INSTRUCTIONS 9. M ost often, the width of the entire length of the last row will need to be cut so it is narrow enough to fit the remaining space. Measure the distance between the floor face edge (exclude the tongue) to the wall. Subtract 3/8 in. from this measurement for expansion gap. Draw a line on the planks. Cut the planks using an electric circular saw with finish saw blades (not included) along the marked line. Discard the excess pieces. 10.
FASTEN-DOWN INSTALLATION INSTRUCTIONS 9. Repeat steps 5 and 7 to install remaining planks in rows. Secure with brads or finishing nails 1 in. to 2 in. from ends and every 4-6 in. along the edge of grooves. 6 2 1- 6. Blind nail at a 45˚ angle through the tongue 1 to 2 in. from ends and every 4-6 in. along the side. . in . in Note: Be sure to stagger ends of boards correctly in adjacent rows to avoid clustering end joints. Note: Countersink the nails.
CARE AND MAINTENANCE The best way to care for the new floor is to schedule routine maintenance, which includes sweeping the entire floor at least once a week to remove dirt and debris that may scratch the floor. High traffic areas such as entrances, doorways and traffic lanes will require cleaning more frequently. • Apply a manufacturer recommended cleaner to a terry cloth or micro fiber mop; do not spray directly onto the floor. Use a back and forth motion with the mop.