
Installation Guide


7
INSTALLATION INSTRUCTIONS
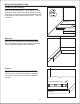
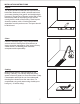
Layout:
The layout should be balanced with equal sizes on
both sides. Measure the width, calculate and mark
your center (starting) line (pencil and straight edge),
however, if the last row of flooring (at the wall) is less
than half the width of the flooring, move the line
over by half the width of the flooring. Plank layouts
VKRXOGEHUDQGRPZLWKLQFKHVHQGVHDP
separation from the previous row. Tile layout should
be brick-bond.
Clean:
Clean the substrate again, using a Hepa filtered
vacuum and mix flooring from several boxes to
ensure a random appearance. Also inspect for any
visible defects, as installing them assumes
acceptance and responsibility.
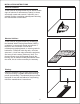
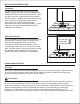
Cutting:
Measure and mark the required length on the
flooring. Carefully, use a sharp utility knife and a
speed or framer’s square to score the surface. Snap
it downwards and finish the cut from underneath,
trimming the release film at the same time. For
complicated cuts, gently warm using a hairdryer or
heat gun (~ 6-inches away).
Page 7