
Installation Guide


4
5
Use a water-dampened cloth to clean the bath storage cabinet. Avoid using abrasive cleaners.
Nettoyez l’armoire de rangement pour salle de bain à l’aide d’un linge humecté d’eau.
Évitez d’utiliser des nettoyants abrasifs.
Use un paño humedecido con agua para limpiar el gabinete para almacenaje de baño.
Evite usar limpiadores abrasivos.
CARE AND MAINTENANCE/ENTRETIEN/CUIDADO Y MANTENIMIENTO
TROUBLESHOOTING/DÉPANNAGE/SOLUCIÓN DE PROBLEMAS
PROBLEM
PROBLÈME
PROBLEMA
POSSIBLE CAUSE
CAUSE POSSIBLE
CAUSA POSIBLE
CORRECTIVE ACTION
MESURE CORRECTIVE
ACCIÓN CORRECTIVA
Doors do not align; the space
is too big or too tight between
doors./Les portes ne sont
pas bien alignées ou l’espace
entre les portes est trop petit
ou trop grand./Las puertas
no se alinean-se distancian
mucho o muy poco.
Hinge misalignment./
Désalignement
de la charnière./
Desalineamiento de
las b isagras.
Hold door, loosen screw,
position, then tighten./
Tenez la porte, desserrez
la vis, modiez la position
de la porte, puis resserrez
la vis./Sujete la puerta,
desajuste el tornillo,
mueva la posición y
apriete.
Up-Down
Haut-bas
Arriba-abajo
In-Out
Intérieur-extérieur
Hacia dentro-hacia fuera
Left-Right
Gauche-droite
Izquierda-derecha
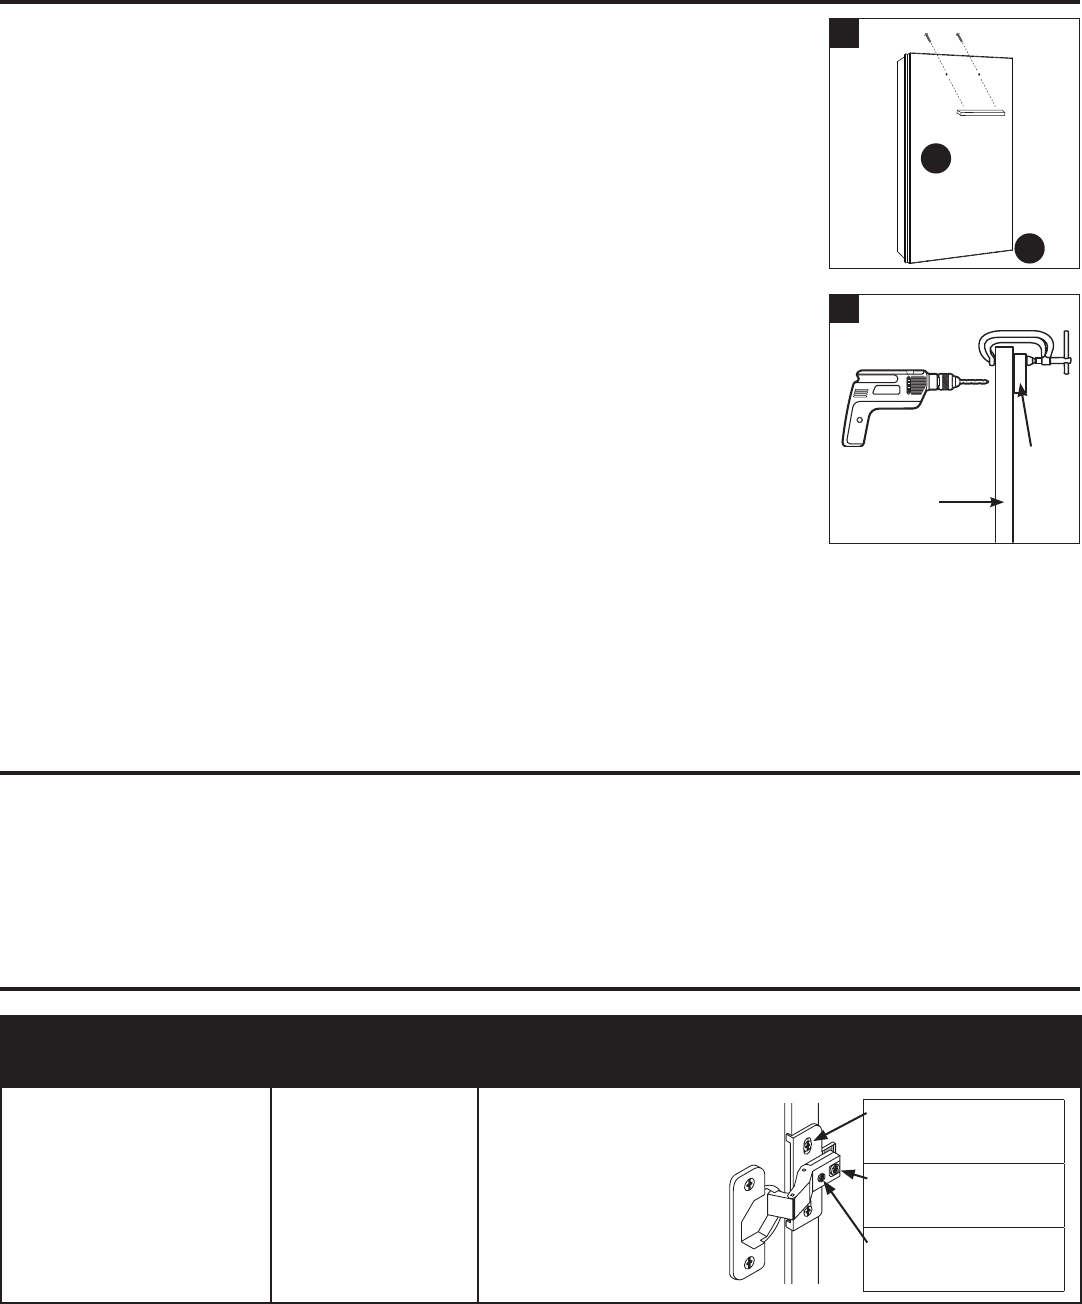
5. ATTACHING THE HANDLE. Reference the Hardware Drill Template (included)
to bore the holes before attaching the handle. Pre-mark the front where the
handle is desired. Drill through your marks from the outside of the door to the
inside. A 1/8 in. drill bit is recommended to allow for nal adjustments to exact
alignment.
Note: To prevent “blowout” (rupture of the surface when drilling), clamp a piece
of scrap wood (not included) to the back of the door prior to drilling. Once the
holes are bored, attach the handle (AA) with the screws (BB).
FIXATION DE LA POIGNÉE : Consultez le gabarit de perçage de la
quincaillerie (inclus) pour percer les trous avant de xer la poignée. Marquez
l’endroit où vous souhaitez installer la poignée. Percez les trous à partir
de l’extérieur de la porte vers l’intérieur. L’utilisation d’un foret de 1/8 po est
recommandée pour effectuer les derniers réglages avec précision.
Remarque : Pour éviter les éclats (rupture de la surface lors du perçage), xez
un morceau de retailles de bois (non inclus) sur l’arrière de la porte avant de
commencer le perçage. Une fois les trous percés, xez la poignée (A) à l’aide
des vis de poignée (BB).
FIJACIÓN DEL MANIJA: Consulte la plantilla de taladrado para aditamentos
(incluida) para perforar los oricios antes de jar el manija. Marque
previamente la parte frontal donde desea que vaya el manija. Taladre
en las marcas, desde la parte externa de la puerta hacia el interior. Se
recomienda usar una broca para taladro de 1/8 pulg. a n de hacer posible
los ajustes nales y lograr un alineado exacto.
Nota: para prevenir un “reventón” (rotura de la supercie durante el taladrado),
je un trozo de madera que no use (no se incluye) con una abrazadera a la
parte posterior de la puerta antes de perforar. Una vez que haya perforado los
oricios, je el manija (AA) con los tornillos (BB).
AA
BB
5
INSTALLATION INSTRUCTIONS/INSTRUCTIONS POUR L’INSTALLATION/INSTRUCCIONES DE
INSTALACIÓN
Door
Scrap
wood