
Use and Care Guide


3
4
4.
wire together with electrical tape
(not included).
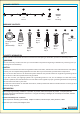
Tape the wire nuts (BB) and the
BB
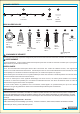
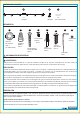
ASSEMBLY INSTRUCTIONS
1. Loosen the bracket screws
(DD) which hold the fixture to the
mounting bracket (AA) and
separate the mounting bracket
(AA) from the fixture (A).
1
3.
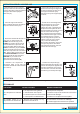
wire ends. Connect WHITE wire
from fixture (A) to WHITE wire
from outlet box using wire nut
(BB). Connect BLACK wire from
fixture (A) to BLACK wire from
outlet box using wire nut (BB).
Connect BARE/GREEN ground
wire from outlet box to BARE
ground wire from fixture (A) with
wire nut (BB).
Strip 3/4 in. of insulation from
2.
(AA) to the outlet box with outlet
box screw (CC).
Fasten the mounting bracket
CC
2
AA
Outlet Box
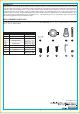
CARE AND MAINTENANCE
TROUBLESHOOTING
To clean, unplug the lamp and wipe it with a damp, non-abrasive cloth.
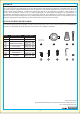
PROBLEM POSSIBLE CAUSE CORRECTIVE ACTION
Bulbs won't light.
Fuse blows out or circuit
breaker trips.
1. Bulbs are burned out.
2. Power is off.
3. Bad wire connection.
4. Bad switch.
1. Replace the bulb.
2. Check if power supply is on.
4. Test or replace the switch.
3. Check wiring.
1a. Check the wiring connection.
1b. Consult a qualified electrician.
1. Crossed wires or power wire
is grounding out.
A
3
BB
WHITE
BLACK
BARE/
GREEN
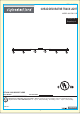
5. Place the fixture (A) against
the mounting surface, aligning
holes in fixture (A) with holes in
the mounting bracket (AA). Insert
bracket screws (DD) and tighten.
A
6
6. Use Allen key (GG) to loosen
the Allen screw (HH) and separate
the anchor from the rod. Select a
location on the ceiling for the
anchor and drill hole. Insert
mounting plug (EE). Place anchor
over mounting plug. Insert
machine screw (FF) and tighten.
Insert rod into anchor and tighten
Allen screw (HH). Repeat for
other anchor. Make sure anchors
are spaced to provide the best
support for the fixture (A).
1
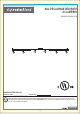
7
7.
holders on fixture (A). Turn the
bulbs (B) clockwise to secure.
Attach trim rings (C) to the bulbs
(B).
Insert bulbs (B) into the lamp
A
B
C
DD
DD
AA
A
DD
AA
A
DD
GG
HH
EE
FF