
Manual
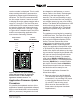
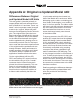

Table Of Contents

Issue 3, August 2018 Model 44D User Guide
Page 24 Studio Technologies, Inc.
2. Remove the cover from the Model
44D’s enclosure. Begin by removing
the four 5/64 hex head screws and
internal tooth lock washers, two per
side. Be certain to save the screws and
lock washers so that re-assembly will
be fast and painless. Then carefully
remove the cover. Locate the USB con-
nector on the main circuit board. It’s
in the rear of the unit, adjacent to the
connector used for line output channel
2. Also on the circuit board and adja-
cent to the USB connector is a very
small LED indicator.
3. Insert the prepared USB flash drive into
the USB connector.
4. Apply power to the Model 44D. Power
can be provided by Power-over-Ether-
net (PoE) associated with a connected
Ethernet signal or from an external
12 volt DC source.
5. The Model 44D will run a “boot loader”
program that will immediately load
the new application firmware file
(M44D.bin). This process will take
only a few seconds. During this time
period the LED adjacent to the USB
connector will flash slowly on and off
green. Once the entire loading process
is over, taking approximately 10 sec-
onds, the Model 44D will restart using
the newly-loaded application firmware.
6. At this time the Model 44D is function-
ing with the newly-loaded application
firmware and the USB flash drive can
be removed. But to be conservative,
remove the power first and then re-
move the USB flash drive.
7. Replace the cover and secure it using
the previously removed screws and
lock washers.
8. Apply power to the Model 44D and
“read” the application firmware version
number by observing the two meters
associated with the line outputs. En-
sure that this is the desired version.
Note that upon power being applied to the
Model 44D if the USB flash drive doesn’t
have the correct file (M44D.bin) in the root
folder no harm will occur. Upon power up
the green LED adjacent to the USB con-
nector will flash on and off rapidly for a few
seconds to indicate that a valid file was
not found and then normal operation us-
ing the unit’s existing application firmware
will begin.
Ultimo Firmware Update
As previously discussed in this guide,
the Model 44D implements Dante con-
nectivity using the 2-input/2-output Ultimo
integrated circuit from Audinate. The
Dante Controller software application can
be used to determine the version of the
firmware (embedded software) residing
in the Ultimo “chip.” This firmware can be
updated by way of the Model 44D’s Ether-
net connection. The latest Dante firmware
file is available on the Studio Technolo-
gies’ website. The Dante Firmware Update
Manager application is used to install the
firmware. This program is also available
for download on the Studio Technologies’
website (www.studio-tech.com).