
Manual
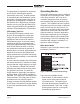

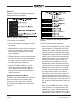
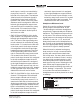
Table Of Contents

Model 216 User Guide Issue 5, November 2017
Studio Technologies, Inc. Page 15
Selecting the correct amount of gain for an
application might take a little experimenta-
tion. The goal is to bring the mic’s signal
up to the Dante reference level which is
typically considered to be –20 dBFS. (This
is 20 dB below digital maximum.) Operat-
ing at this signal level will help ensure the
delivery of “clean” audio to the destination
device or devices.
There’s no “perfect” gain setting that this
guide can recommend. The two issues
that impact the setting are output sensi-
tivity of the connected microphone and
the acoustical output level of the micro-
phone’s user. With some headset micro-
phones, such as the Sennheiser HMD 26
or HMD 27, selecting an initial setting of
43 or 46 dB would be appropriate. Users
who speak loudly might need to have the
gain reduced to 40 or even 37 dB. Quiet
users might need 49 or 52 dB of gain.
Using the device that’s digitally connected
(via Dante) to the Model 216’s main output
channel is typically the best way to check
the signal level and the setting of the mic
preamplifier. Most devices have some
method of providing an indication of
the digital level, either in the form of a
numerical value, virtual meter, or LED-
based meter display. The Studio Technolo-
gies’ Model 5202 Dante to Phones and
Line Output Interface would also be an
excellent means of monitoring the Model
216’s output level. The Model 5202
provides a 2-channel LED level that is
calibrated in dBFS.
Level Status LED Indicator
A dual-color LED, located on the back
panel directly below the microphone
input connector, is provided as an aid
when using the Model 216. It can also be
useful when setting the gain of the Model
216’s microphone preamplifier. It provides
a 3-step indication of the output level of the
microphone preamplifier. It will light green
when the signal level is –40 dBFS
or greater, a mix of green and red when the
signal level is –14 dBFS or greater,
and red only when the signal level is
–4 dBFS or greater. When the gain of the
microphone preamplifier is set optimally a
normal signal applied to the microphone
input will cause the LED to light green
with an occasional “peak” signal caus-
ing the LED to light both green and red at
the same time. A more conservative gain
setting would find that the LED would only
light green. A gain setting that results in the
LED ever lighting only red is incorrect. The
gain must be reduced or the audio quality
will be severely compromised.
Local Selection of P48 Phantom Power
The Model 216 can provide P48 phantom
power to the connected microphone. The
two pushbutton switches can be used to
control whether or not P48 phantom power
is active. Pressing both pushbuttons simul-
taneously will toggle (change) the on/off
state. The decimal point indicator, located
on the lower right corner of the 2-digit
LED display, is used to show the P48
phantom power on/off status. When the
decimal point is lit P48 phantom power is
enabled. By the very nature of phantom
power it should be able to be left enabled
at all times. But generally people prefer
to turn it off unless required for a specific
microphone.
Remote Configuration of Gain and P48
Phantom Power
Using the STcontroller application allows
personal computer users to view and ad-
just the Model 216’s mic preamplifier gain
and P48 phantom power on/off status.