
User Manual

Intert Photographic
www.intertphotographic.com
support@intertphotographic.com
@intertphoto
Instructions for LEDM100D LED Monolight
For Your Safety
To prevent damage to your light or injury to others, please read the
following safety precautions in its entirety before using this equipment.
Keep these safety instructions where all those who use this equipment
will ready them.
Do not disassemble or modify
This light contains high voltage components. Failure to observe this pre-
caution may result in electric shock and/or product malfunction. Should
the light break open as the result of a fall or other accident, be sure to
disconnect the power and take the light to an authorized maintenance
center for inspection.
Keep Dry
Moisture can cause electric shock. Do not handle with wet hands. This
light should not be immersed in or exposed to water or rain. Failure to
observe this precaution could result in re or electric shock.
Keep out of reach of children
This light contains small parts that may pose a choking hazard. Consult a
physician immediately if a child swallows any part of this light.
Do not expose to high temperatures
Do not leave this light in a closed vehicle, in direct sunlight, or in other
areas subject to extreme heat. Failure to observice this precaution could
result in re or damage to the casing or internal components.
Getting Started
Mounting to the Light Stand
Loosen the Stand Mount Lock [5]. Place the light onto a light stand with a
standard 5/8” mount. Re-tighten the Stand Mount Lock [5].
Adjusting the Head Angle
While holding on to the Adjustment Handle [3] , loosen the Tilt Lock [4].
Position the light where you need it and re-tighten the lock.
Turning on the Light
Plug the power cable into the Power Socket [12], then into a 110v/60Hz
AC outlet. Turn on the light with the Power Switch [11].
Adjusting the Brightness
Use the Dimmer Knob [2] to adjust the brightness from 100 (full power)
to 00 (lowest power). Power output is displayed on the LCD Display [10].
Attaching Modiers
• Bowens S-Type Modiers - Insert the three prongs of the modier
ring into the Bowens S-Type Mount [7] and rotate clockwise until
you hear a click. To remove the modier, pull back on the Modier
Quick Release [1] on the top of the light to release the lock and
rotate the modier counter clockwise.
• Pop-up Softboxes - Pull the four sides of the light opening of the
softbox around the outside of the Pop-up Softbox Ring [8] and
tension will hold it in place.
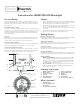
1. Modier Quick Release
2. Dimmer Knob
3. Adjustment Handle
4. Tilt Lock
5. Stand Mount Lock
6. Umbrella Mount
7. Bowens S-Type Mount
8. Pop-up Softbox Ring
9. Radiator
10. LCD Display
11. Power Switch
12. Power Socket & Fuse Box
Anatomy of the Light
• LED Monolight
• Protective Shipping Cap
• Power Cable
• 24” (60cm) Pop-up Softbox
What’s Included
1
2
3
4
5
6
7
8
Caution
1. High-power LED’s produce a lot of heat. The Radiator [9] will be hot
after prolonged use. Do not touch the radiator or attach the Protec-
tive Shipping Cap for at least fteen minutes after use.
2. Be sure to allow the light to fully cool before storage. Failure to do
so may result in damage to the light or storage case.
3. Do not touch the LED. Oils from your ngers will shorten the life of
the diode.
4. Avoid sudden impacts as this can damage the head and/or LED.
5. When not in use, disconnect from the power supply.
9
2
10
1112