Wh heele ed Sprrinkle ers Owne er’s Ma anual W WARNING: : Read careffully and understand all ASSEMBLY A A AND OPERA ATION INSTR RUCTIONS before operating. Failure to t follow the safety rules and other ba asic safety precau utions may re esult in seriou us personal injury.
Thank you very much for choosing a Strongway product! For future reference, please complete the owner’s record below: Serial Number/LotDate Code: ________________________________ Purchase Date: ____________________________________________ Save the receipt, warranty, and this manual. It is important that you read the entire manual to become familiar with this product before you begin using it. These wheeled sprinklers are designed for certain applications only.
Table of Contents Intended Use ..........................................................................................................................................4 Technical Specifications ......................................................................................................................4 Important Safety Information ...............................................................................................................5 Assembly .............................................
Intended Use These larger, wheeled sprinklers provide watering coverage to an area up to 150 feet in diameter to irrigate very large areas such as gardens, yards, and playgrounds. The sprinklers include brass sprinkler heads with 2-5 nozzles to match sprinkler output with water supply capability. The heads can be set to a full- or partial-circle water spray pattern.
Im mportant Safety In nformation Rea ad and underrstand all insstructions beffore using this tool. The operator o musst follow basic preccautions to re educe the rissk of persona al injury and//or damage to t the equipm ment. The e warnings, cautions, c and d instructionss in this manu ual cannot co over all posssible conditions or situa ations that co ould occur. Exercise E com mmon sense and caution when using this tool.
WOR RK AREA SA AFETY Do not n allow the e sprinkler to come into co ontact with an a electrical source. s It is n not insulated d and conttact will causse electrical shock. s Be aware a of all power p lines, electrical circcuits and me echanical hazzards in the a area. PER RSONAL SAF FETY Stayy alert, watch h what you are doing, and d use common sense wh hen operating g the sprinkle er. Do not use u it while you y are tired or under the e influence of drugs, alco ohol, or mediccation.
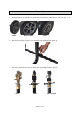
Assembly 1. Slide both wheels (7) onto the axle (6) and fasten the wheels using washers, pins and caps (1 - 3). 49508 49509 & 49521 49522 2. Attach the water pipe (4) to the axle (6) with the two 40*8mm bolts &nuts (8). 3. Attach the sprinkler head (5) to the water pipe (4) and tighten with a wrench.
Befo ore Each h Use Insp pect the area a before each h use. Che eck for damag ged parts be efore each usse. Carefully check that the tool will o operate prope erly and perfform its intended function n. Replace da amaged or worn w parts im mmediately. N Never operate the tool with a dama aged part. Operating Instrructions Irriigation waterr should neve er contact electric powerr lines or anyy other powerr source.
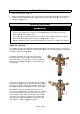
49509, 1” Sprinkler The sprinkler head is a fully adjustable sprinkler that will operate in a full circle pattern or any part of a circle pattern by adjusting the stops at the base of the head. Refer to the instructions below to set the sprinkler head to the desired operating pattern. For full circle operation, loosen the sprinkler stops and slide the stops all the way down the brass sprinkler base so they do not contact the reverse lever on the back of the sprinkler head as shown at right.
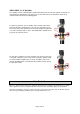
49521/49522, 1-1/4” Sprinkler The sprinkler head is a fully adjustable sprinkler that will operate in a full circle pattern or any part of a circle pattern by adjusting the stops at the base of the head. Refer to the instructions below to set sprinkler head to the desired operating pattern. For full circle operation, loosen sprinkler stops and slide stops all the way down the brass sprinkler base so they do not contact the reverse lever on the back of the sprinkler head as shown at right.
Maintenance Maintain your tool. It is recommended that the general condition of any tool be examined before it is used. Keep your tool in good repair by adopting a program of conscientious repair and maintenance in accordance with the recommended procedures found in this manual. When any malfunction occurs, stop using the sprinkler and correct it. Clean the sprinkler head nozzle frequently to reduce build-up from mineral residue. Use only identical replacement parts.
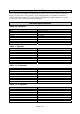
Parts List Part No. Description Quantity 1 Cap 2 2 Pin 2 3 Washer 2 4 Water Pipe 1 3/4" Sprinkler Head (49508) 5 1" Sprinkler Head (49509) 1 1-1/4" Sprinkler Head (49521 & 49522) 6 Axle 1 8"Heavy PolyTires(49508) 7 8” Solid Rubber Tires (49509 & 49521) 2 10” Flat-Free Tires (49522) 8*40mm Bolt &Nut (49508) 8 2 8*55mm Bolt &Nut (49509, 49521, & 49522) Troubleshooting Problem Solution The sprinkler head is partly clogged and only a small amount of water comes out.
Limited Warranty Northern Tool and Equipment Company, Inc. ("We'' or '"Us'') warrants to the original purchaser only ("You'' or “Your”) that the Strongway product purchased will be free from material defects in both materials and workmanship, normal wear and tear excepted, for a period of one year from date of purchase. The foregoing warranty is valid only if the installation and use of the product is strictly in accordance with product instructions.
Distributed by Northern Tool and Equipment Company, Inc. Burnsville, Minnesota 55306 NorthernTool.