
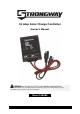
Product Manual


Page 6 of 10
Assembly
No assembly required except the connections for operation. See Operating Instructions
Before Each Use
Check for damaged connectors or lights on the controller before each use. Replace the controller if
damaged.
Check that the controller as well as the solar panel, battery clamps and other parts are clean to
ensure proper function. If necessary, wipe the components with a damp cloth – DO NOT use soap or
solvents when cleaning and DO NOT pour chemicals on the panel.
Operating Instructions
• Check the ratings of the solar panel, and battery before connecting the charge controller. The
controller’s rated voltage is 12 volts and the input current must be less than 12 amps.
• Do not expose the charge controller to rain or wet conditions. The controller is NOT weather-
proof.
• Keep the controller away from direct sunlight, electric heaters, or high temperature electrical
appliances.
• When connecting the system for use, ensure that the connections are positive-to-positive (red-to-
red) and negative-to-negative (black-to-black). Wrong connections will cause damage to the
controller, solar panel and/or the battery.
1. Arrange the controller, solar panel, battery, and any load within the range of the connecting cables
(only the controller is provided in this package).
Note: The controller is designed to be flush mounted or wall mounted
2. Cover the solar panel to prevent arcing while making system connections.
WARNING: Failure to follow the connection sequence below may damage the controller.
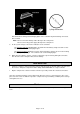
3. First, connect the controller to the battery first, using the “Battery” cable attached to the controller
and a battery clamp cable (not included), noting the CAUTION above. (The connection is shown
below.)
4. Then, connect the controller to the solar panel using the “Solar Panel” plug & cable on the
controller. Plug the J-plug on the cable to the J-plug on the solar panel. (The connection is
shown below.)