
Product Manual


Page 9 of 14
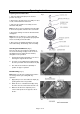
Installing the Upper Bead on the Rim (Fig. 7)
1. Once the lower bead is completely over the
edge of the rim, you can install the upper bead.
2. Follow the same steps above to install the
upper bead.
3. Remove the demount/remount tool (#11)
when the tire is on the rim.
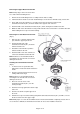
Optional: Assembling the Inflation Strap (Fig.
8)
Note: The inflation strap is an optional
accessory that aids in seating the tire.
1. Thread the strap as shown. Proper threading
is important to correct operation.
2. Push evenly down on the upper side of the
tire until the lower bead is seated on the rim.
3. Place the inflation strap around the tire at
the center of the tread. Tighten by pulling the
loose end of the strap until it is evenly
secure, all around the tire.
4. Pull the handle of the inflation strap around
to squeeze the tire until the upper bead is
seated on the rim.
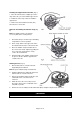
Inflating the Tire (Fig. 9)
1. Once both beads are seated on the rim,
begin filling the tire with air.
Note: Keep the inflation strap around the tire.
2. Continue filling the tire until both upper and
lower beads are seated on the rim.
3. Release the inflation strap from the tire and
reinstall the valve core if it has been
removed.
4. Inflate the tire to the correct air pressure.
The proper air pressure is indicated on the
side wall of your tire.
5. Remove the tire assembly from the hub holder (#16) and place all parts back in the box.
⚠WARNING
Over inflation of the tire can cause an explosion and personal injury.