
Product Manual


Page 7 of 14
Operating Instructions
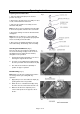
Preparing the Tire Before Use
1. Place the hub holder (#16) in the desired
position. See Fig. 2.
2. Remove the air from the tire assembly. For best
results, remove the tire’s valve core.
3. Place the tire and wheel assembly over the
threaded shaft (#18).
Note: The tire is first assembled to the hub holder
in an inverted position, with the valve stem down.
4. Thread the locking nut onto the threaded shaft
and tighten.
Note: If the tire is still loose, a spacer (#2) and
alignment cone (#1) are provided to properly hold
the tire assembly to the hub holder.
5. Once the tire is clamped in position, it’s ready
for bead breaking, dismounting, and remounting.
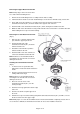
Attaching the Bead Busters (Fig.3)
Place the two piece bead busters (#4 & #5) on
the ear of the locking nut (#3). Insert one of the
two alignment tools (attached to the handle)
through the holes provided.
1. Position the bead buster B (#5) so its shoe is
touching the edge of the tire’s rim.
2. Insert the second alignment pin (#6) through
the holes provided on the bead buster A (#4).
3. This locks the bead busters (#4 & #5) in
position for proper operation.
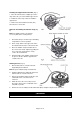
Bead Breaking (Fig. 4)
Note: Make sure the tire is firmly fastened to the
tire changer before proceeding with any
operation.
1. Apply firm pressure to bead buster A (#4) by
pushing down on the long handle.
2. Guide the shoe of bead buster B (#5) along
the rim to force the tire bead off the rim seat.
3. When the first bead is completely loose,
remove and repeat for the opposite side of
the tire.
Fig. 2