
Product Manual

Page 9 of 16
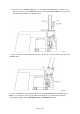
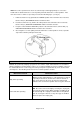
Note: These three positions have been set at the factory to work appropriately as soon as the
handle tube is attached. Check to see if the pallet jack works well in the 3 control positions. If the
forks do not raise or lower as expected, proceed to the following steps (see Fig. 4):
1. Pull the Control Lever (5) upward to the LOWER position. If the fork frame does not lower,
turn the Nut (13) CLOCKWISE until the fork frame lowers.
2. Push the Control Lever (5) down to the LIFT position. If the fork frame does not elevate,
turn the Nut (13) COUNTER-CLOCKWISE until the fork frame elevates.
3. Keep the control handle in NEUTRAL position. If the fork frame lowers, turn the Nut (13)
COUNTER-CLOCKWISE until the fork frame does not lower.
4. Check again to see if the pallet jack works well in the 3 control positions. If not, repeat the
steps above until the pallet jack works well.
Fig. 4
Maintenance
Maintain the product by adopting a program of conscientious repair and maintenance in accordance
with the following recommended procedures. It is recommended that the general condition of any tool
be examined before it is used. Keep your tool in good repair. Keep handles dry, clean, and free from
oil and grease. The following chart is based on a normal operation schedule.
Maintenance Interval
Maintenance Point
Daily before operating
Daily inspection and maintenance of the pallet jack is required,
especially for the wheels and the axles. Remove threads or
rags on the wheel or axle if any are detected. Unload and
lower the forks to the lowest position after every job is finished.
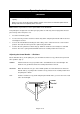
Before and after operating
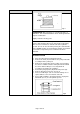
OIL. Check the oil level annually by removing the oil plug (46)
on top of the pump housing. When changing or adding oil, fill
the tank through the oil plug hole with 0.26L of new hydraulic
jack oil. See Figure 5. Do not use any other type of oil. When
finished, replace the oil plug (46).