
Product Manual


Page 10 of 14
Clean the battery terminals. Be careful to keep corrosion or battery acid from getting in or
around your eyes.
For batteries with removable vent caps, if required, add distilled water to each cell until the
battery fluid reaches the level specified by the battery manufacturer.
Do not overfill.
For batteries without removable vent caps, carefully follow the manufacturer’s charging
instructions.
Study all of the battery manufacturer’s specific precautions and recommendations for charging
and for recommended rates of charge.
Make sure that you have a 12V lead acid battery. Determine voltage of battery by referring to
the vehicle owner’s manual.
If the battery is left discharged for an extended period, the battery could become sulfated. A
sulfated battery will not accept a normal charge.
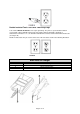
Charging the Battery in the Vehicle
1. Before connecting and disconnecting the DC clamps or ring terminals, remove the AC plug from
the electrical outlet.
2. Check polarity of battery posts. A positive (POS, P, +) battery post usually has a larger diameter
than a negative (NEG, N, -) battery post.
3. Connect the positive (red) clip or ring terminal from the battery charger to a positive ungrounded
post of the battery.
4. Connect the negative (black) clip or ring terminal to the vehicle chassis (must be a heavy gauge
metal part of the frame) or engine block away from battery. DO NOT connect the clip to the
carburetor, fuel lines, or sheet-metal body parts.
5. Connect the charger AC supply cord to the electrical outlet (reverse process to remove charger).
Removing the Charged Batter From the Vehicle
1. Before connecting and disconnecting the DC clamps or ring terminals, remove the AC plug from
the electrical outlet.
2. Attach at least a 60cm 6-gauge (AWG) insulated battery cable to negative battery post.
3. Connect the positive (red) clip or ring terminal from the battery charger to the positive post of the
battery.
4. Position yourself and the free end of the cable as far away from battery as possible, then connect
the negative (black) clip or ring terminal from the charger to the free end of cable. DO NOT face
the battery when making final connection.
5. Connect the charger AC supply cord to electrical outlet (reverse process to remove charger).
Connection Methods
This charger comes with 2 run connect charging leads for extra versatility – standard clamps and ring
terminals. The battery may be charged using either of the two connection options.
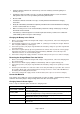
Charging Status Indicator Lights
There is only one indicator light to describe the charging status:
LED Indicator
Charging Status
Neither RED or GREEN
Abnormal condition, most likely means that the charger is not connected
properly to AC power.
Flashing RED
The battery charger has AC power available and it is functioning properly.
Connect the alligator clips or ring terminals to battery terminals.
Flashing GREEN
Connection is good and the charger is charging the battery. It will flash
GREEN till the battery is fully charged.
Solid GREEN
Charging is completed, it is in floating now. Battery is fully charged.
Solid RED
Abnormal condition, there must be in error, such as reverse polarity or
short circuit.