
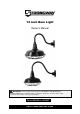
Product Manual


Page 6 of 13
safety and could affect the life of the product. There are specific applications for which the 12”
warehouse barn light was designed.
Do not use any harsh abrasives, detergents or anything containing ammonia to clean your light.
Risk of fire. Install fixture at least 4 feet from the ground.
Risk of electric shock. Disconnect power before servicing.
This product must be installed in accordance with the applicable installation code by a person
familiar with the construction and operation of the product and the hazards involved.
Keep protective barrier in place or replace removable parts after servicing.
Blinking light of this thermally protected luminaire may indicate overheating.
Ensure the fixture is properly grounded.
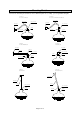
Main Parts of Product
Reference Number
Subassembly
1
Shade
2
Cage
3
Gooseneck
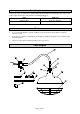
Assembly Instructions
⚠WARNING
Disconnect power at main electrical box before installing fixture.
1. Run black, white, and green wires from lamp holder (3) through shade (1), washer (4), O-ring
(5), hex connector (6), connect nipple (7), gooseneck (8), back plate (9), and gasket (10).
2. Place the lamp holder (3) fixture onto the hex connector (6). Rotate the connect nipple (7) to
the hex connector (6). Rotate the gooseneck (8) to the other end of connect nipple (7). Seat
other end of gooseneck into the back plate (9). Then rotate set screws (15) into back plate to
attach the gooseneck (8) in place. Note: wrap each of the threads with PTFE thread seal
tape (20).
3. Attach the black fixture wire to the black supply wire and the white fixture wire to white supply
wire, using wire nuts (21) provided.
4. Connect the green fixture wire to grounding screw in the junction box.
5. Attach the back plate (9) and gasket (10) to junction box by #8-32 screws (16). You can also
use tapping screws (17) and wall plugs (18) for attaching.
Additional Instruction for Gooseneck with Knuckle Mounting
1. Disconnect power at main electrical box before installing fixture.
2. Run black, white, and green wires from lamp holder (3) through shade (1), washer (4), O-ring
(5), hex connector (6), knuckle (11), gooseneck (8), back plate (9), and gasket (10).
Note: Before crossing the wire, foist the cotton varnished sleeve (21) into the knuckle to
protect the wire. Refer to the figure for wiring through the knuckle.
3. Place the lamp holder (3) fixture onto the hex connector (6). Rotate the connect knuckle (11)
to the hex connector (6). Rotate gooseneck(8) to the other end of knuckle (11). Seat other
end of gooseneck into the back plate (9). Then rotate set screws (15) into back plate to attach
the gooseneck (8) in place. Note: wrap each of the threads with PTFE thread seal tape (20).