
User's Manual


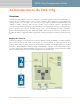
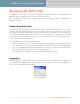
Table Of Contents

4 EWS-150g Configuration Guide
EWS-150g Configuration Guide
Managing the EWS-150g
The EWS-150g is preconfigured for basic functionality by the WISP using the unit’s embedded Web
Management Interface (WMI). The unit can also be configured remotely.
This User’s Guide describes how to configure and monitor your EWS-150g using its embedded Web
Management Interface.
Connecting to the Unit
Use an Ethernet cable (provided) to connect the EWS-150g to a computer. Alternatively, you can connect the
unit to the computer via an Ethernet switch, hub or router. If the network is using a DHCP server, the unit will
be assigned an IP address automatically (even when DHCP assigns an IP address the unit can always be
reached from its default IP address, which is 169.254.1.250). If no DHCP server is available, the unit can only
be reached via its default IP address (169.254.1.250). To establish a connection, the EWS-150g and your
computer must be on the same IP segment.
Use your Web browser to connect with the EWS-150g.
◗ When using a DHCP server, you can identify the IP address assigned by the server by looking in the log
files of the DHCP server, or by using the Strix Manager/One plug-in; however, the Manager/One plug-
in is only compatible with Microsoft® Internet Explorer, version 6.1 or higher. You can download the
plug-in from http://www.strixsystems.com/support/downloads.asp.
◗ If no DHCP server is available, use the unit’s default IP address (169.254.1.250).
Logging In
At the Login prompt, use the default user name and password to log in to the EWS-150g. The default user
name and password is Admin (for both). After entering the user name and password, click on the OK button to
log in to the unit’s Web Management Interface.
Figure 3. Login Prompt