
Installation Guide


2
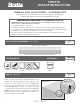
STEP 2 - APPLY ENDCAPS
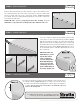
STEP 3 - FINISH ENDCAPS
STEP 4 - FINISH BACKSPLASH
from VT Industries
™
from VT Industries
™
from VT Industries
™
Remove the paper backing on the endcap to expose the adhesive. Line
the endcap up with the end of the countertop so that it is flush with
the front edge and top of the countertop surface. (Figure 2-1) With
your hand, press the endcap firmly against the end of the countertop
to activate the adhesive.
CAUTION: Take care to properly position the endcap, as it is
difficult to reposition the endcaps after the adhesive has set.
Once the endcap is applied, using utility scissors, trim
off as much of the excel material as possible. (Figure
3-1) Then facing the endcap, use a fine file and safety
glasses, place the file nearly parallel to the counter. File
in a single-direction movement towards the countertop,
always from front to back, (Figure 3-2) until there is no
excess material and the endcap is flush with the end of
the countertop.
CAUTION: Take care
while filing so you do
not file the surface
of the countertop,
as it can damage the
finish. Masking tape
can be placed on the
countertop surface to
protect while filing, if
necessary. (Figure 3-3)
(Figure 2-1)
©2020 VT Industries, Inc. All rights reserved.
All trademarks and registered trademarks are the property of their respective owners.
from VT Industries
™
For additional information on installing your Stretta
countertop, please visit strettacountertops.com
(Figure 3-1)
(Figure 3-2)
If needed, to finish the end(s) of your backsplash, locate the 4” pieces
of endcap material. (Figure 4-1) First, use a dry cotton cloth to wipe
the exposed end(s) of the backsplash to remove any loose particles
or debris. Then follow steps 2 and 3 above to finish the exposed
ends of the backsplash.