
Installation Guide
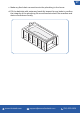
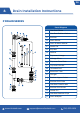
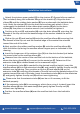
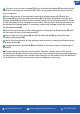
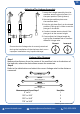
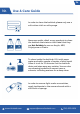
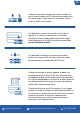
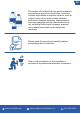
Table Of Contents

streamlinebath.com
support@streamlinebath.com (310) 935-0028
Wire 1
Wire 2
Wire 3
Wire 4
1. Insert the linkage assembly into the
overflow, ensuring the trip lever is in
the open position (Facing down).
Incorrect
Ensure that the linkage wire is correctly attached
during the installation of the trip lever drain, as an
improper installation may impact drainage.
Correct
Measurement From Step 1 Use Wire
11’’ to 14’’
12.5’’ to 15.5’’
15.5’’ to 18.5’’
17.5’’ to 20.5’’
1
2
3
4
Measure the distance from the center of the overflow hole to the bottom of
the bathtub, where the drain elbow meets the waste tee.
Refer to the table below and select the correct linkage wire for the distance
measured.
Step 1
Step 2
*Drawings are not to scale
Adjusting The Linkage Assembly
2. Secure the overflow plate onto
the overflow drain.
3. Push the trip lever firmly to the closed
position (Facing up) in order to set the
plunger in the drain.
4. Conduct a water test to check if the
plunger is at the correct height.
Wire Length: 6.5''
Wire Length: 8''
Wire Length: 11''
Wire 3
Wire Length: 14''
Linkage Wire Diagram
5. If not, adjust the linkage length by
turning the threaded rod or choose a
different linkage wire.
31