
User's Manual


Using Objet Studio
5–20
DOC-06800 Rev. A
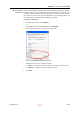
Objet Studio splits the object into an assembly of component parts, each
a separate stl file (shell).
The object appearson the build tray and in the model treeas an
assembly of parts (shells). You can assign each part a different model
material (This is explained in Model Material Settings on page 20).
Figure 5-23: Object after being converted to an assembly of component parts
Model-Material
Settings
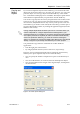
Before placing objects on the build tray in Objet Studio, you should pay
attention to the material selection settings on the Tray Settings ribbon.
Figure 5-24: Material selection settings
•
By default, the material selection settings on the ribbon correspond to
the model cartridges loaded in the printer.
•
The materials displayed are basic model materials. These materials can
later be combined to create digital materials (see Digital Materials on
page 21).
•
The material displayed on the top (VeroWhite, in the figure above) is
considered the primary model material (Model 1). It is assigned to
objects that do not have a material assignment when you place them on
the build tray. For example, since stl files do not contain information
about the model material, Objet Studio assigns the primary model
material to them. Also, if you try to insert objdf files whose assigned
materials are not recognized by your version of Objet Studio, you can
insert the file by substituting the primary model material for the
missing materials.
•
Select
Single Material
if you want to print using only one material
both of the material drop down menus contain the same material. If
you decide to print with multiple materials, the material in the top
drop down menu remains assigned to the object until you select
another material.
•
If you insert an objdf file into an empty build tray, and the model
material assignment does not match the settings on the Tray Settings
ribbon, these settings are changed automatically. However, if there is an
D R A F T
16 June
2013