
User's Manual


Using Objet Studio
5–18
DOC-06800 Rev. A
Selecting
Objects
To manipulate an object on the build tray or assign characteristics to it
(model material, building style etc.), you must first select the object. You
select an object by clicking it, either on the tray or in the model tree. Its
image on the build tray changes color (to light blue, by default) and its
name is highlighted in the model tree. You can select multiple objects by
drawing a box around them with the mouse cursor, or by pressing the
Ctrl
or
Shift
keys while clicking additional objects.
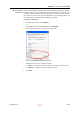
Alternatively, select or de select objects using the following Edit menu
commands:
•
Select All
•
Invert Selection
•
Undo Select object
Figure 5-19: Edit menu
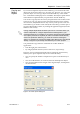
Sometimes, you need to select individual elements of an assembly. Other
times, you need to select the entire assembly. The Selection icon displayed
on the ribbon determines what will be selected when you click on the
model:
or
To change the selection action:
1. On the Tray Settings or Model Settings ribbon
a. Click the Selection icon: or .
b. On the flyout toolbar, click the appropriate icon:
Figure 5-20: Selection flyout toolbar
Splitting
Objects into
Components
You can convert a complex object to an assembly of component parts. To do
so, you split the stl file that represents the object into a group of separate stl
files, each one representing a component. (This is referred to in the Objet
Studio interface as separating the object into shells.) You can then assign a
model material to each stl file, and you can save the newly created
assembly as an objdf file.
Select Group
Select Element
D R A F T
16 June
2013