
User's Manual


DOC-06800 Rev. A
6–35
Objet1000 - Connex 2 User Guide
12. Click
Next
to display the next head alignment screen, and again select
the number representing the most closely aligned vertical lines on the
transparency for that print head.
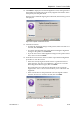
When you have finished aligning all of the heads, the following screen
is displayed.
Figure 6-44: Update confirmation screen
13. Continue as follows:
•
To make the alignment changes in the printer, make sure that Yes is
selected, and click
Next
.
•
To recheck the alignment test results before making the alignment
changes in the printer, click
Previous
.
•
If you do not want to make alignment changes in the printer at this
time, select No and click
Next
.
14. In the final wizard screen, choose to either repeat the head alignment
procedure or close the wizard.
•
If the most closely aligned vertical lines for a print head were at
either extremethe first or seventh lineschoose Yes to run the
Head Alignment Wizard again, then click
Next
.
The transparency test will show if the heads are now properly
aligned, andif notthe wizard will allow you to fine tune the
alignment.
•
If the vertical lines for the print heads were not aligned at either
extreme, choose No to close the wizard, then click
Next
.
Figure 6-45: Final Head Alignment Wizard screen
D R A F T
16 June
2013