
User Guide
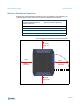
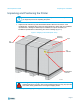
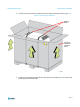
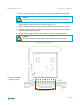


Table Of Contents

Site Preparation Guide Preparing For Installation
Page 11
10. Move the printer into its approximate operating location and gently lower it until it rests on
its feet.
Position the printer to allow at least three feet of clearance on all sides until the
installation process is complete, see
“Physical Specifications and Space
Requirements” (page 2)
. Refer to Chapter 2 of the F120 User Guide for final setup
instructions.
11. Open the oven door, cut the cable tie securing
the startup materials, and remove the
startup materials from the oven chamber.
12. Remove the orange tape securing the tip wipe assemblies to the purge chute.
13. Open the top cover. Remove the orange clip affixed to the X belt, and cut the orange tie
wr
ap secur
ing the X motor to the printer’s frame (front-left corner of frame).