
User's Manual
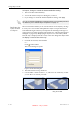
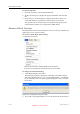

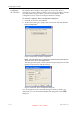
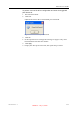


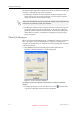
Table Of Contents
- About This Guide
- Safety
- Introducing the Alaris 3-D Printing System
- Installing Objet Software
- Using Objet Studio
- Using Job Manager
- Operating & Maintaining the Alaris30 3-D Printer
- Starting the Alaris30 Printer
- Loading Model and Support Cartridges
- Producing Models
- Resuming Production After Printing has Stopped
- Changing the Model Material
- Keeping the Alaris Printer in Idle Mode
- Shutting Down the Alaris Printer
- Maintaining the Alaris Printer
- Routine Maintenance Schedule
- Cleaning the Print Heads
- Pattern Test
- Improving Print Quality
- Cleaning and Replacing the Wiper
- Cleaning and Replacing the Roller Waste Collector
- Aligning the Print Heads
- Replacing Print Heads
- Calibrating the Load Cells
- Replacing the Odor Filter
- Replacing the UV Lamp
- Replacing the Waste Container
- Cleaning the Exterior Panels
- Backing-Up and Restoring Printer Settings
- ReInitiate Wizard
- Handling Printed Models

Using Objet Studio
5–28
DOC-24000 Rev. A
To inspect, change or cancel the Smartcast/Hollow setting:
1. Selectamodelonthebuildtray.
2. AccesstheAdvancedPropertiesdialogbox,asabove.
3. IfyouchangeorcanceltheSmartcast/Hollowsetting,click
Apply.
Displaying the
Cross Section
of Objects
TheSectionfeatureenablesyoutoviewtheinteriorofanobjectby“slicing”
itonanyaxis.Youcanthenmanipulatetheobjecttoinspecttheinterior
fromdifferentangles.Thismaybeimportantfordecidingonthetypeof
supportnecessarywhenproducingthemodel(see“ChoosingtheSupport
Strength”onpage
5‐26).Displayinganobject’scrosssectiononlyaffects
howthetrayisdisplayedonthescreen;itdoesnotchangetheobjectitself.
To display a cross section of the tray:
1. FromtheToolsmenu,selectSection.
or—
Clickonthetoolbar.
TheSectiondialogboxopens.
Figure 5-36:Section dialog box
2. SelecttheEnableClickingcheckbox.
3. UsetheslidercontrolsfortheX‐,Y‐,andZ‐axestocutthetraysothat
youseethecrosssectionyouwant.
You can set Smartcast/Hollow as a default property for all models placed on
the build tray. See “Default Object Properties” on page 17.
Figure 5-37: Whole view
Figure 5-38: Cross-section view, after
using the Z-slider
DRAFT 4 - July 11, 2010