
User's Manual
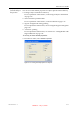
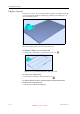
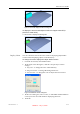
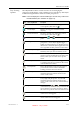
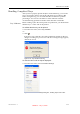
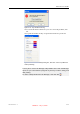
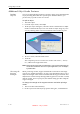
Table Of Contents
- About This Guide
- Safety
- Introducing the Alaris 3-D Printing System
- Installing Objet Software
- Using Objet Studio
- Using Job Manager
- Operating & Maintaining the Alaris30 3-D Printer
- Starting the Alaris30 Printer
- Loading Model and Support Cartridges
- Producing Models
- Resuming Production After Printing has Stopped
- Changing the Model Material
- Keeping the Alaris Printer in Idle Mode
- Shutting Down the Alaris Printer
- Maintaining the Alaris Printer
- Routine Maintenance Schedule
- Cleaning the Print Heads
- Pattern Test
- Improving Print Quality
- Cleaning and Replacing the Wiper
- Cleaning and Replacing the Roller Waste Collector
- Aligning the Print Heads
- Replacing Print Heads
- Calibrating the Load Cells
- Replacing the Odor Filter
- Replacing the UV Lamp
- Replacing the Waste Container
- Cleaning the Exterior Panels
- Backing-Up and Restoring Printer Settings
- ReInitiate Wizard
- Handling Printed Models

DOC-24000 Rev. A 5–19
Alaris30 User Guide
Figure 5-24: Model displayed with bounding box
To display the area around objects needed for support material (to
produce a matte finish):
¾
SelectView > Display Thickening Box.
Figure 5-25: Model displayed with thickening box
Display Colors
YoucancustomizesomeofthecolorsusedfordisplayingObjetStudio
screensandfordisplayingobjectsonthebuildtray.
To change the colors displayed in Objet Studio screens:
1. FromtheToolsmenu,selectDefine Colors.
2. IntheDefineColorsdialogbox,clickthecolorpatchyouwantto
change:
• TrayColor—tochangethecolorofthebuildtray
• BackgroundColor—tochangethebackgroundcolor
• SelectionColor—tochangethecolorofobjectsthatareselected
Figure 5-26:Define Colors dialog box
3. IntheColorsdialogbox,selectacolor,orclickDefine Custom Colorsto
createyourowncolorandshadefordisplayingthisitem.
4. Click
OK.
DRAFT 4 - July 11, 2010