
User's Manual
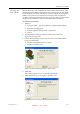
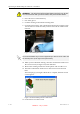
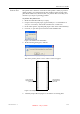
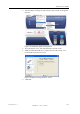
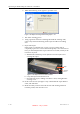
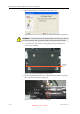
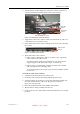
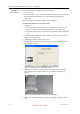
Table Of Contents
- About This Guide
- Safety
- Introducing the Alaris 3-D Printing System
- Installing Objet Software
- Using Objet Studio
- Using Job Manager
- Operating & Maintaining the Alaris30 3-D Printer
- Starting the Alaris30 Printer
- Loading Model and Support Cartridges
- Producing Models
- Resuming Production After Printing has Stopped
- Changing the Model Material
- Keeping the Alaris Printer in Idle Mode
- Shutting Down the Alaris Printer
- Maintaining the Alaris Printer
- Routine Maintenance Schedule
- Cleaning the Print Heads
- Pattern Test
- Improving Print Quality
- Cleaning and Replacing the Wiper
- Cleaning and Replacing the Roller Waste Collector
- Aligning the Print Heads
- Replacing Print Heads
- Calibrating the Load Cells
- Replacing the Odor Filter
- Replacing the UV Lamp
- Replacing the Waste Container
- Cleaning the Exterior Panels
- Backing-Up and Restoring Printer Settings
- ReInitiate Wizard
- Handling Printed Models

DOC-24000 Rev. A 7–29
Alaris30 User Guide
6. Pullthebottomofthelockingpin,andturnitcounter‐clockwise,to
raisethedrain‐tubebracketfromtherollerwastecollector.
Figure 7-42: Raising the drain-tube bracket
7. Supporttherollerwastecollectorwithyourhandunderit,andusea
3mmAllenkeytoloosenthescrews.
8. Pullouttherollerwastecollector,takingcarenottotouchordamage
thescraper.
Figure 7-43: Roller waste collector
9. Inspecttherollerwastecollector.
• Ifthescraperisdamaged,oraftersixmonthsofuse,replacethe
entireroller‐waste‐collectorunit.
Savetheusedunit.Atthenextmaintenancevisit,thecustomer‐
supportengineerwillreplacethescraper,forfutureuse.
• Ifthescraperisnotdamaged,carefullycleanthewastechannel
withisopropanolandacleaningcloth.
Topreventdamagetothescraper,wipeitfromitsmiddleoutward,
toeachside.
To install the roller waste collector:
1. Carefullyinserttheroller‐waste‐collectorunit.
2. Securetheunitevenly,byalternatelytighteningthescrews.
3. Turnthelockingpinclockwise,tolowerthedrain‐tubebracketonto
therollerwastecollector,andsecurethepininitssocket(see
figure 7‐41onpage 7‐28).
4. Movetheprintblockbacktothemiddleoftheprinter
.
5. ReplacetheUVlampassemblyandsecureit.
6. Inthewizardscreen,click
Canceltoreturnthebuildtraytoitsformer
position.
Drain-tube
bracket
Roller waste
collector
Roller-waste-collector screws
Scraper
Waste channel
DRAFT 4 - July 11, 2010