
User's Manual
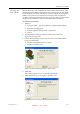
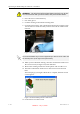
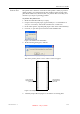
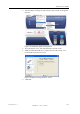
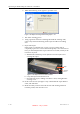
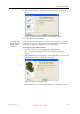
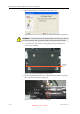
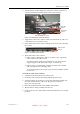
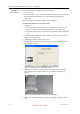
Table Of Contents
- About This Guide
- Safety
- Introducing the Alaris 3-D Printing System
- Installing Objet Software
- Using Objet Studio
- Using Job Manager
- Operating & Maintaining the Alaris30 3-D Printer
- Starting the Alaris30 Printer
- Loading Model and Support Cartridges
- Producing Models
- Resuming Production After Printing has Stopped
- Changing the Model Material
- Keeping the Alaris Printer in Idle Mode
- Shutting Down the Alaris Printer
- Maintaining the Alaris Printer
- Routine Maintenance Schedule
- Cleaning the Print Heads
- Pattern Test
- Improving Print Quality
- Cleaning and Replacing the Wiper
- Cleaning and Replacing the Roller Waste Collector
- Aligning the Print Heads
- Replacing Print Heads
- Calibrating the Load Cells
- Replacing the Odor Filter
- Replacing the UV Lamp
- Replacing the Waste Container
- Cleaning the Exterior Panels
- Backing-Up and Restoring Printer Settings
- ReInitiate Wizard
- Handling Printed Models

Operating & Maintaining the Alaris30 3-D Printer
7–26
DOC-24000 Rev. A
6. Whenthefollowingscreenappears,openthecover.
Figure 7-35: Wiper Cleaning wizard during steps 7–10
7. Putonthecleaninggloves.
8. Usingagenerousamountofcleaningfluidandthecleaningcloth,
removeanymaterialremainingonthewiperandthesurrounding
area.
9. Inspectthewiper.
Ifthewiperisscratched,tornorworn,orifyoucannotcleanit
completely,replaceit.Toensurethatmodelqualityisnotreducedov
er
time,youshouldreplacethewiperatleastonceamonth,evenifyoudo
notnoticeanywear .
a. WiththeM2.5Allenkey,loosen(butdonotremove)thescrew
securingthewiper.
Figure 7-36: Wiper and excess-material drain
b. Graspthewiperunitandremoveit.
c. Insertthenewwiper,makingsurethatitislevel,andtightenthe
securingscrew.
10. Inthewizardscreen(seefigure 7‐35),confirmthatthewiperbladeis
clean,andclick
Next.
11. Makesurethatyouhaveremovedalltoolsandcleaningmaterials
fromtheprinter,andclosethecover.
Wiper
Securing
screw
DRAFT 4 - July 11, 2010