
User Manual

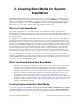


Using Network Administrator a minimum of three fields are required Boot Server name, CDROM Boot
Image Name, and Client Name.
The Boot Server name is the name of the server the boot media will be stored on. Use the drop down arrow
to select a configured server. The boot media will be created using the selected client, but will be copied to
“CDROM & Network Boot Images” directory as configured on the selected boot server.
The CDROM Boot Image Name is the name of the image as it will be stored on the filesystem. For clarity
you may choose to name the image to reflect the hostname or operating system level of the client. Further
detail about the image can be saved in the User Description field and can be viewed when managing boot
media through the sbadmin interface.
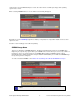
The Client Name is selected with the drop down menu to the right of the field. This is the client used to
create the boot media. The clients Operating System Level and Platform Type will automatically be
populated into the appropriate fields. Boot media is not specific to this client, and can be used to boot
similar systems running the same Solaris update level.
When this process is complete, you may copy this image to a system containing the CD writer device, if
there is no CD burner on the Boot Server.
Hard Disk
If you configured a disk for System Backups (see SBAdmin User Guide), then this disk (or disks) can
also be made bootable to boot directly to the system recovery process. This allows you to perform your
system backups to a local (or SAN-attached/portable) disk, then boot and reinstall the system from that
same disk with no need for other backup media.
Using this option will not change how the system boots by default. After configuring
a disk to boot to the SBAdmin System Install process, you must select to boot from
that disk from within your system firmware boot menus.
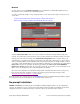
To create a bootable disk, select Utilities!Create System Installation Boot Media!Hard Disk Boot Media.
Select the Client Name to configure using the drop down arrow to the right. Next, select the disk to
configure in the Hard Disk Name field by using the arrow to the right of the entry field. When pressing the
arrow, the system will be queried to find one or more disks that were configured using the option Configure
a Disk(s) for local System Backups in the SBAdmin User Guide. If no disks are listed, then none were
configured for system backup/recovery.
Storix System Backup Administrator 9 Version 8.2 Solaris System Recovery Guide