TM Enabling Backups for Windows and MAC OS X
Trademarks and Copyrights © Copyright Storix, Inc. 1999-2005 Storix is a registered trademark of Storix, Inc. SBAdmin is a trademark of Storix, Inc in the USA and other countries Linux is a registered trademark of Linus Torvalds. Microsoft and Windows 98, Windows 2000, Windows Me, Windows NT and Windows XP are registered trademarks of Microsoft Corporation Apple and MAC OS X are trademarks of Apple Computer, Inc.
Table of Contents 1. Introduction ......................................................................................................... 4 How to Use this Guide ................................................................................................................................ 4 SBAdmin Windows (SMB) Backup Feature ................................................................................................. 4 Sharing SMB Folders ............................................................
1. Introduction Storix System Backup Administrator (SBAdmin) provides the ability to backup, from an SMB Host (currently supported on Linux), data that is shared from a Windows or MAC OS X system. This is because both Windows and MAC OS X support the SMB network protocol, which can be used to share folders on the system. On a Windows or MAC system, a user account is created. The files created by this account, accessed using a username and password, can be made available to SBAdmin for backups and restored.
Sharing SMB Folders As already discussed, this is not a function of SBAdmin, but one what must be setup on your SMB (Windows/MAC) system. Beginning with Chapter 2, we provide as much detail as possible for configuring shared folders on each of the different systems and versions.
Restoring SMB Backup Data The data backed up from the SMB shares on the Windows or MAC systems may be restored to their original locations, to different shares on the same system, a share on a different SMB system, or even to a directory on a Linux or AIX system (also configured as an SBAdmin client). Using Actions!Restore Data from a Backup, you can select the backup to restore from.
2. Windows 98 / ME The following instructions explain how to set up a shared folder on a faculty or staff computer running Windows 98. The shared folder can be made accessible to anyone who has the password and is using a Windows machine on the Wellesley campus network. Configure the Computer for File Sharing You will only need to configure your computer for file sharing once. If file sharing is already set up on your computer (i.e.
Sharing a Folder To specify a particular folder you want to share, follow these steps. These steps can be repeated for multiple folders if, for example, a certain folder must be shared with only one group of people and another folder with another group of people, using different passwords. Only folders may be shared, not individual files, i.e. if you wish to share a file named blue.doc, then you must put blue.doc inside a folder and then share that folder by following the directions below. 1.
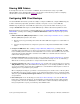
c. Depends on Password - If you want some people to have read-only access but others to have full access to the folder, you can maintain two passwords, one for read-only access and the other for full access. If you select this option, choose two passwords, and type each password into the appropriate box. 5. Click OK. 6. Windows will ask you to confirm the passwords so make sure to take note of them and keep them in a private place. 7.
3. Windows 2000 / NT This section explains how to set up file sharing on Windows 2000. Configure the Computer for File Sharing You will only need to configure your computer for file sharing once. If the option for file sharing is already set up on your computer or if you wish to set up another shared folder on your computer, continue to the instructions to Share a Folder. 1. Click on the Start button and then select Settings!Control Panel. 2. Double-click on the Network Dial-Up Connections. 3.
d. Click once on File and Printer Sharing for Microsoft Networks to select it and then click OK. e. Click Close. 5. If the computer asks to restart, click Yes to restart. The computer will automatically restart. Sharing a Folder Only folders may be shared, not individual files, i.e. if you wish to share a file named blue.doc, then you must put blue.doc inside a folder and then share that folder by following the directions below. 1. Right-click on the file or folder to be shared.
4. Click once on the local user you wish to add permission to access this folder. If you want all users to access the folder, select Everyone. If the user is password-protected, the user’s password will still be required to access the share 5. To change each user account's permissions for the folder, in the Permissions window, click once on the name of the user account. Once it is highlighted, you may allow or deny them privileges according to the options below.
9. Click Apply and then click OK. The folder icon will change into a folder resting on an arm . This indicates that this folder is now shared. Only the domain users whom you have given access to the shared folder(s) will be able to access the files within the folders.
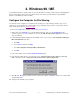
4. Windows XP PRO The following instructions explain how to set up a shared folder on a computer running Windows XP Professional. Configure the Computer for File Sharing You will only need to configure your computer for file sharing once. If the option for file sharing is already set up on your computer or if you wish to set up another shared folder on your computer, continue to the instructions to Share a Folder. 1. Click on Start and then select the Control Panel. 2.
c. Click Add. d. Click once on File and Printer Sharing for Microsoft Networks to select it and then click OK. e. Click Close. f. If the computer asks to restart, click Yes to restart. The computer will automatically restart. Sharing a Folder Only folders may be shared, not individual files, i.e. if you wish to share a file named blue.doc, then you must put blue.doc inside a folder and then share that folder by following the directions below. 1. Right-click on the file or folder to be shared.
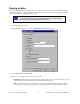
4. Click once on the local user you wish to add permission to access this folder. If you want all users to access the folder, select Everyone. If the user is password-protected, the user’s password will still be required to access the share 5. To change each user account's permissions for the folder, in the Permissions window, click once on the name of the user account. Once it is highlighted, you may allow or deny them privileges according to the options below.
The folder icon will change into a folder resting on an arm Storix System Backup Administrator - 17 - . This indicates that this folder is now shared.
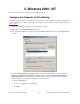
5. MAC OS X The following instructions explain how to use the file sharing capabilities of Mac OS X. From MAC OS X, you can enable access to each user account’s home directory on the system. By enabling access to the user’s home directory, any Windows user on the network will have access to ALL files in the user’s home directory, if they have the username and password. Enabling Windows Sharing The following steps can be performed for each user account for which the home directory may be shared.
4. Look below the Services list for a message such as: Windows users can access your computer at //192.168.1.123/Zante Note that, in this example “Zante” is the user account name who’s files are shared. Storix SBAdmin can now backup files from this “share” using the hostname (or IP address) and the username and password.