AIX System Recovery Guide Version 8.
Trademarks and Copyrights © Copyright Storix, Inc., 1999-2014 Storix is a registered trademark of Storix, Inc.
Table of Contents 1. Introduction ......................................................................................................... 5 When to Use this Guide .............................................................................................................................. 5 2. Create Boot Media for System Installation ........................................................ 6 When to Create Boot Media .......................................................................................
Install From Local NFS Mount .............................................................................................................. NFS Considerations ............................................................................................................................. Set or Change Network Configuration .................................................................................................. Select Remote Tape Device ..................................................................
1. Introduction The SBAdmin AIX System Installation Guide is a supplement to the SBAdmin User Guide, providing details on reinstalling an AIX system from a SBAdmin System Backup. Note that a System Backup is not limited to reinstalling the same system from which it was made, but it may also be used to “clone” the original system onto different systems containing the same or different hardware.
2. Create Boot Media for System Installation The SBAdmin Backup Administrator User Interface provides a very simple procedure for creating boot media, which is described in this section. This interface may be used to create bootable tapes, boot CDROM images, network boot images, or can configure a local hard disk to boot the system recovery process. This interface may create any of the boot media types.
Creating System Installation Boot Media To create the boot media, select Utilities->Create/Manage Boot Media->(CDROM/Network/Hard Disk/Tape) from the menu bar in the administrator main menu. Creation of each media type is described separately: CDROM image This process will make a CDROM ISO image, but will not actually burn the image to the CDROM. This image may be copied to any system where your CD/RW device resides where you can use any software or program you choose to copy the image to the CDROM.
must be at the start of the tape. If you have system backups on a tape (or disk) that are not themselves bootable, you can create a separate bootable tape to boot the system, and then select a different installation media. To create a bootable tape, select Utilities!Create System Installation Boot Media!Tape Boot Media. This option allows you to create the tape from any client, but write to a tape drive on a different server.
Select the client on which the disk will be made bootable in the Client Name field. Then select a disk to configure in the Hard Disk Name field by using the arrow to the right of the entry field. When pressing the arrow, the system will be queried to find one or more disks that were configured as a Local System Backup Disk. If no disks are listed, then none were configured for system backup/recovery.
on the system. If this not the same as the network from which the client will be booted, change this field accordingly. If device support for the selected platform type or network adapter type selected was not installed on the system the boot image is created on, an error message will be displayed. If so, you must either select a different system on which to create the boot image or install the required device support from the AIX installation media. Select the name of the Boot server.
Be very careful when using this option. The user will not have the option of intervening in the system recovery process if the boot media was created for no-prompt installation. The exception is if the defaults are not valid (such as an installation device not being available), or if the backup data will not fit onto the new system’s hardware without some re-configuration. When creating CDROM boot media, the following options are available when using the option to Create System Installation Media.
Enabling Remote Installation Manager This feature will allow connection to the SBAdmin System Installation Process from any remote system. With proper authority, a remote user can connect to, diagnose and perform system installation of a system after that system has been booted from the SBAdmin boot media. This process may be started from the SBAdmin interface on a Network Administrator system, or from any SSH client application.
The Remote Install Username is set to “sbadmin” and may not be changed. Enter a password in the Remote Install Password field. The password will be necessary to login to the remote install client. Select the Network Adapter that should be configured to connect to the remote install client. If performing a network boot, you may select UseBootAdapter to use the adapter that was used to perform the network boot.
3. Network Boot/Install Configuration The information provided in this section will prepare a client system for network boot and installation from a backup server. Understanding Network Boot and Network Installation Any client system defined to the admin system may be installed or reinstalled from a System Backup. That System Backup will typically reside on the disk or on a tape device attached to a backup server.
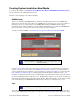
Options may appear or disappear from this screen depending on your selections. The screen is broken into two main sections; one for configuring the Client network boot options and one for configuring the Client network install options. The setting for the Install Mode at the top of the screen determines whether or not the Client network install options section will appear. The following fields are used to configure the client to boot from a boot server: 1. 2.
3. Boot Image Name: Use the arrow button to the right of the entry field to select from a list of boot images previously created using the Create Bootable Installation Media (Network) option. The boot image name selected will determine the AIX level, platform, and network type that will be used to install the client.
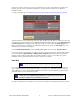
configuration used for the recovery. This is done to prevent multiple systems configured with the same IP, which may cause conflicts and network problems. Select “no” to this option if you do not want this network migration to take place. 14. Volume Groups to create/restore: This option is used to select the volume groups from the backup that will be created and restored, or imported, during the installation process.
To install using an alternate server network, a drop-down list is provided on the Network Boot/Install Configuration Screen labeled "Alternate Server Network". If you want the alternate server network connection to be used for network install, select the appropriate network. If no alternate network is not selected, the default network connection used by the client to reach the server (as defined by the server hostname and network routing information on the client) will be used.
c. Ethernet interface: If the network adapter used to reach the install server differs from that used to reach the boot server, and an ethernet adapter is used, select the correct interface to use, either en (standard ethernet) or et (IEEE 803.1 ethernet). d.
4. Booting to the System Installation Process Booting the Various Platform Types This section will provide the specific step-by-step instructions for booting a system to the Installation and Maintenance Menu, used to install a system from a System Backup. Note that the steps differ widely between systems and new systems are being introduced frequently.
Network To network boot using System Management Services (SMS): 1. Initiate SMS using the instructions provided above. 2. Enter the client, server and gateway IP addresses. This is normally found under Remote IPL, Network Boot, or BOOTP settings. Note that the gateway address is usually left blank if none is used, but on some systems it should be set the same as the server address (indicating no gateway required).
The detailed instructions for using the options on this menu are provided in the sections Reinstall a System from a Backup and Change the Volume Group, Logical Volume and Filesystem Information. Troubleshooting a Network Boot To boot from the network, a server must have first been configured to provide a network boot image to this client. Those steps are outlined in the section Network Boot/Install Configuration.
6. Be sure that the bootpd and tftpd daemons are enabled on the boot server. Check the /etc/inetd.conf file on the boot server to ensure that these daemons are not commented out (not preceded with a #). If so, uncomment these lines by removing the “#”, then type “refresh –s inetd”. 7. After initiating the network boot from the client, check to see if the bootpd daemon was started on the boot server. This daemon will usually remain running for several minutes after it is started, even if the boot fails.
c33 User selected an ASCII display as a console device c40 AIX installation programs are being restored from the boot tape c43 Error restoring the AIX install programs during a tape boot Either the tape media is defective, the tape drive is defective, or the boot tape is incomplete. Create another boot tape and try booting from tape again.
operating system files, or if the operating system on the backup was missing files necessary for normal system operation. Refer to the error messages provided and correct the problem before continuing the installation. c58 The user is being prompted to change the key switch to allow for normal system boot The key switch is set to the SERVICE position and must be changed to the NORMAL position in order to reboot the system from disk after completion of the installation.
3. An /etc/tftpaccess.ctl file exists on the boot server but does not provide access to the /storix/netboot directory (where ‘/storix’ is the SBAdmin data directory). 4. On a PCI-based system, you cannot use the leading zeros for any of the IP address in the SMS Menu. Even though the first tftp command works the second one will fail. Recreate the network boot image on the server and re-enable the network boot client, making sure all values are correct.
5. Reinstall from a System Backup A System Backup may be used to reinstall either the original system or a different system with either the same or different hardware configuration. To initiate the installation, you must first boot the client from either a network boot server or from the local tape using the instructions found in the section Booting to the System Installation Process.
As indicated, you will have 60 seconds to turn off the system to prevent the system installation process from continuing (and possibly overwriting all data on the system). There is no way to manually interrupt an install process created for no-prompt installation and cause it to display the installation menus. Refer to Enable/Disable Network Installation of a Client for information how to pre-answer any questions normally asked during the install process which are required for a no-prompt installation.
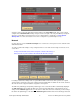
====================================================================== BACKUP DATA IS ENCRYPTED ====================================================================== To read the backup data, an encryption key is required. You may supply a 32-byte HEX key to decrypt the data. If you used a 16-byte ASCII (text) key to generate the HEX key, you may also enter it here.
After booting from a local tape When booting from tape, there are no pre-configured system installation settings. However, it will be assumed that the tape from which the system was booted contains the system backup that is to be installed. If not, you may select either another local tape device or a device or file on a network install server, from which to install the system.
Using Keys and Getting Help Because these menus appear on the client and not on the admin system, the menus are provided in a form viewable on ASCII terminals. The use of the mouse is not available. Most keyboards will support arrow keys while others do not. Also, some keyboards have page up and page down keys, help keys, etc, that others do not.
Change Installation Server or Device The default installation server and device, if any, will be displayed at the bottom of the screen. If the system was booted from the network, the install server will default to the boot server unless a different install server was defined when the client was configured for network boot. If the system was booted from a local tape, the server is assumed to be “local” (or none) and the installation device is assumed to be the tape drive the system was booted from.
If you are restoring from a parallel tape device, then you should select all tape drives that make up that device. Otherwise you should only select a single tape drive. After selecting the tape drive, press F3 or ESC and the following window will pop-up on the screen: If the backup you wish to install from is not the first backup on the media, type the backup sequence number in the Backup Sequence Number field.
You may also use sequential tape devices to restore from the backup if the backup spans multiple tapes and you want the installation to automatically span the tapes inserted in different devices. This option is identical to the use of a Sequential Tape Device. The devices previously configured on the system are not known when booting in installation mode, so this option provides you a method of defining sequential devices on the local system. You must select at least two drives from the list.
To restore from a NFS mounted backup the Server IP Address, the Client IP Address, the Network Device, and the Share on Server fields must be filled in. If the client requires a gateway to reach the NFS server enter the Gateway Address. When selecting the network device, use the F4 key to list the adapters available on the system. The option to Apply Network Configuration to Restored System indicates whether you wish to migrate the above client network settings to the restored system.
mount –V nfs –o MOUNTOPTIONS SERVERIP:NFSSHARE /images The system recovery process does not support mounting NFS shares that require any type of authentication (ie Kerberos). Set or Change Network Configuration You may set or change the network install server from which to obtain the backup. The backup itself may be on a tape attached to the server or on the server’s disk drive.
Once you have made your selection, the drive will be checked to ensure that it is available and the name of the device will be displayed at the bottom of the screen, and you will be returned to the Change Installation Server or Device menu. Select Remote Disk Backup If a network install server is selected and available (indicated by the Server field at the bottom of the screen), you may select to install from a disk file backup available on the server.
If you expect a backup image to appear in the list that does not, it may be that the backup was written with permission for only the original client to read it. If the client to install is not the same as the original client (or the client is installing from a different network adapter and therefore has a different hostname), you must change the backup image to allow clients other than the originating client to read it. Refer to Change Access Permission of a Disk Backup for details.
You will need to enter additional information used to contact the TSM server on the screen below: TSM Client Configuration You are required to enter the NODEname of the TSM client you are installing. Note that this is not necessarily the same node from which the backup was originally created. If you know the node’s password, enter it in the NODE Password field. If you do not know the node password, then you will be required to supply the TSM Administrator username and password in the fields below.
TSM Administrator Configuration The TSM administrative user information need only be entered if you do not know the NODE Password. Also, by logging onto the server as the administrative user, instead of using the node password, you will have access to all backups on the server, even those for which the permission was set to only allow owner access in the backup profile. Once you have entered all of the required TSM information, press the F3 or ESC key to return to the previous menu.
Upon completion of the installation, with the exception of any changes made to the LVM information, the new system will look identical to that of the original system from which the backup was made. Network Re-configuration (avoiding conflicts) If the system installed from the backup is NOT the same system from which the backup was taken, it may be necessary to either reconfigure or disable any network adapters that might cause a network conflict with the original system (which may still be operational).
After you have selected a physical volume, you will receive a final confirmation. After selecting “y” to continue, the following will be performed: 1. The rootvg volume group will be imported from the selected physical volume. 2. The rootvg volume group is varied on. 3. The root (/) and /usr filesystems are checked and repaired if necessary. 4. The /etc/filesystems file in the root filesystem is checked to ensure it contains the necessary entries for the base operating system filesystems.
b. The rootvg volume group is varied on. c. The rootvg volume group is checked to ensure that enough space is available to recreate the root (/) and /usr filesystems at the size necessary to restore the data from the backup. If not, you will be informed so and the installation will terminate, providing only an option to reboot the system. It is not possible to varyoff the rootvg volume group once it is varied on, therefore the installation may not be continued. d.
2. The Remote Install Username is set to “sbadmin” and may not be changed. Enter a password in the Remote Install Password field. The password will be necessary to login to the remote install client. 3. Select the Network Device (adapter) that should be configured to connect to the remote install client. 4. Enter the IP Address used to configure the network adapter.
To change the groups ID simply begin typing and it will replace the old group id. Press the escape key to save the new setting and return to the previous menu. Start a Maintenance Shell When selecting this option, you will be placed at a shell prompt (preceded by “maint>”), where you may perform certain maintenance tasks. Note, however, at this time, the only operating system available is running in installation mode and is therefore limited to a subset of commands.
6. Change the Volume Group, Logical Volume and Filesystem Settings The options described in this chapter are only for AIX clients. This section describes the process of changing the volume group, logical volume, and/or filesystem information retrieved from a backup before using the option to Recreate Volume Groups, Recreate Logical Volumes or Filesystems, or Reinstall from a System Backup.
The option Change Filesystem Settings will not appear if you are installing a system from a Power System Backup. The option Change Volume Group Settings will not appear if you have chosen only to Recreate Logical Volumes or Filesystems from a backup.
available options for the corresponding field and select an option from the list. To select an option, use the arrow keys to highlight the desired option and press Enter. The selected option will be placed in the entry field and the pop-up window will disappear. Press the ESC or F3 key from this menu to either return to the Installation and Maintenance Menu if you are installing a system, or to continue with the options Recreate Volume Groups or Recreate Logical Volumes or Filesystems on an active system.
Detailed help on each option may be obtained by pressing the F1 or “!” keys. You will not be able to create the volume group until you have selected at least one physical volume on which to create. You must also have selected enough physical volumes to contain all of the logical volumes and filesystems which will be created. To select or change the list of physical volumes on which to create the volume group, move the cursor to the Physical Volume List field and press either the F4 or “$” keys.
When all selections are complete, press F3 or ESC key to select a different volume group from the list (if multiple volume groups are defined) and F3 or ESC again to return to the Change Volume Group & Logical Volume Settings Menu. Change Logical Volume Settings This option may be used to change any logical volume attribute, including the name, size, disk location and other attributes.
Detailed help on each option may be obtained by pressing the F1 or “!” keys. At the upper-right-hand corner of the screen is a box containing information regarding the current size and free space within the volume group this logical volume is assigned to, and information on the original and minimum size of the logical volume.
be displayed, and you may select one or more from the list. When striping is turned on (by entering a number other than 0 in the Stripe Size field), at least two physical volumes must be selected. When all selections are complete, press F3 or ESC key to select a different logical volume from the list (if multiple logical volumes are defined) and F3 or ESC again to return to the Change Volume Group & Logical Volume Settings Menu.
Note that the Enhanced JFS Filesystem type may only be selected when booting from AIX Version 5 or later systems. Detailed help on each option may be obtained by pressing the F1 or “!” keys. If you change information in any fields that may change the amount of space in the filesystem required to restore the data, appropriate messages will appear providing additional information.
Index A H AIX network boot/install level, 20 ascii encryption key, 30 hard disk. See boot media: disk help system installation menu, 32 system installatoin menus, 49 hex encryption key, 30 B backup sequence number, 34 network install, 17 boot logical volume, 43 boot media cdrom, 7 creating, 6 disk, 8 network, 9 when to make, 6 boot server. See network boot server booting, 21, See also network boot SP Nodes, 22 I install from system backup.
boot server, 9, 15, See network boot server install device, 17 install server.