
Operation Manual


6-8
Storex DNR-30H Network Camera
Network SettingsNetwork Settings
Network Diagnostic
Here you can run the diagnostic tool for your current network settings and it will show error messages if any
anomaly is detected. For further information on error messages, please refer to the FAQ section in this manual
or visit "http://ipcam.storex.eu" for more information.
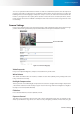
Network Bandwidth
This automatic network connection speed detection is to help users better dene appropriate video bit rate
for their applications. To perform network bandwidth test:
1. In [Setup] > [Network], click on [Network Bandwidth] located on the left menu to start.
2. Wait for Internet Explorer to prompt for the installation of Java plug-in. Then click on the text to
accept.
3. Camera begins detecting connection speed.
4. Once speed diagnostics is done, camera will advise current user on network speed. See below
example:
The message indicates that currently connected network has a bandwidth to support up to 10 network
cameras of identical bit rate settings (either on Stream 1 or Stream 2). If the message shows a less favorable
result, go to [Setup] > [Video] to lower current video bit rate values
Advanced
Adjust the advanced network settings here.
DNS server
Set the DNS server address to be via DHCP or choose to use user-specied DNS address.
NTP Conguration
Set the NTP (Network Time Protocol) server address to ensure the clock of the camera system is
synchronized to show accurate time. To synchronize camera clock via NTP server, choose either to obtain
NTP server address via DHCP server whose address needs to be provided manually, or to use an external/
public NTP server whose default address is set as pool.ntp.org.
HTTP server
Set the HTTP port for your IP camera to be viewed and controlled from the internet. The default port is 80.
Valid port numbers are between 1 and 32767. If you need to use port forwarding, please refer to the Port
Forwarding section in this manual.