
Instruction Manual


FJR100 Users Guide - Rev. C00 StorCase Technology, Inc.
7
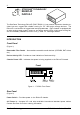
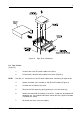
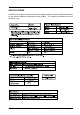
Figure 6: Tape Drive Installation
For Tape Drives:
(Figure 6)
1. Connect the 4-pin DC power cable to the drive.
2. Connect the 5-wire ID select cable to the drive (Figure 5).
NOTE: Use the 0.1 connectors on the ID select cable when connecting to tape drives.
3. Attach I/O plates (not included) to the RhinoJR chassis (Figure 4).
4. Connect the I/O cable to the drive.
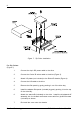
5. Remove the filler panel by gently pushing it out of the drive bay.
6. Attach the stand-offs (included) to the drive. Install the drive/stand-off
assembly into the chassis and bottom mount with four (4) #6-32 screws
(included) as shown.
7. Re-install the cover onto the chassis.