StorCase® Technology Rhino JR FJR100 ® 1-Bay External Expansion Chassis User's Guide Part No. D89-0000-0095 C00 August 2003 StorCase Technology, Inc.
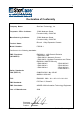
1 Declaration of Conformity Company Name: StorCase Technology, Inc. Corporate Office Address: 17600 Newhope Street Fountain Valley, CA 92708 Manufacturing Address: 17600 Newhope Street Fountain Valley, CA 92708 Product Name: RhinoJr.
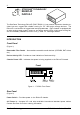
2 STORCASE® TECHNOLOGY RHINOJR FJR100-1 The StorCase® Technology RhinoJR (P/N FJR100-1) 1-bay external expansion chassis provides low cost, rugged and reliable housing for 3.5 half-height storage devices. The RhinoJR is constructed of rugged steel and polycarbonate. Each chassis is equipped with an auto-ranging power supply, power-on and device activity LEDs, highly-rated cooling fan, and all necessary hardware to mount one (1) fixed 3.5 half-height device.
3 SCSI ID Select Switch - Provides SCSI ID selection (Refer to section Selecting the SCSI ID Number for further information). Cooling Fan - Provides ample chassis ventilation (22.1 CFMs). SCSI I/O Connector - RhinoJR can be equipped with 50-pin Centronics, 50-pin Microminiature (HD50) , 68-pin High Density, or 68-pin VHDCI (used for Ultra2 and Ultra160) connectors. Contact StorCase for further ordering information.
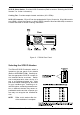
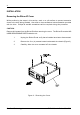
4 INSTALLATION Removing the RhinoJR Cover While performing the steps in this section, work on a soft surface to prevent excessive shock to the drive being installed. Also refer to the manufacturers documentation provided with the drive. Phillips #1 and #2 screwdrivers will be required during this procedure. CAUTION: Remove ALL power from the RhinoJR before removing the cover. The RhinoJR contains NO USER SERVICEABLE PARTS inside the unit. 1.
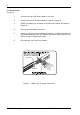
5 Installing the Drive into the RhinoJR NOTE: Removal of the chassis cover is required in order to install the drive. Figure 4: Hard Drive Installation FJR100 Users Guide - Rev. C00 StorCase Technology, Inc.
6 For Hard Drives: (Figure 4) 1. Connect the 4-pin DC power cable to the drive. 2. Connect the 5-wire ID select cable to the drive (Figure 5). 3. Attach I/O plates (not included) to the RhinoJR chassis (as shown in Figure 4). 4. Connect the I/O cable to the drive. 5. Attach the drive mounting brackets to the drive. Install the drive/mounting bracket assembly into the chassis and bottom mount with four (4) #6-32 screws (included) as shown. 6. Re-install the cover onto the chassis.
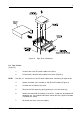
7 Figure 6: Tape Drive Installation For Tape Drives: (Figure 6) NOTE: 1. Connect the 4-pin DC power cable to the drive. 2. Connect the 5-wire ID select cable to the drive (Figure 5). Use the 0.1 connectors on the ID select cable when connecting to tape drives. 3. Attach I/O plates (not included) to the RhinoJR chassis (Figure 4). 4. Connect the I/O cable to the drive. 5. Remove the filler panel by gently pushing it out of the drive bay. 6. Attach the stand-offs (included) to the drive.
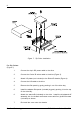
8 Figure 7: Zip Drive Installation For Zip Drives: (Figure 7) 1. Connect the 4-pin DC power cable to the drive. 2. Connect the 5-wire ID select cable to the drive (Figure 5). 3. Attach I/O plates (not included) to the RhinoJR chassis (Figure 4). 4. Connect the I/O cable to the drive. 5. Remove the filler panel by gently pushing it out of the drive bay. 6. Install the adapter filler panel (included) by gently pushing it into the top of the drive bay. 6.
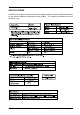
9 SPECIFICATIONS SCSI RhinoJR chassis conform to the Small Computer Systems Interface (SCSI) Standard set by the American National Standards Institute (ANSI). The following specifications are for reference only. FJR100 Users Guide - Rev. C00 StorCase Technology, Inc.
10 LIMITED WARRANTY STORCASE TECHNOLOGY, Incorporated (StorCase) warrants that its products will be free from defects in material and workmanship, subject to the conditions and limitations set forth below. StorCase will, at its option, either repair or replace any part of its product that proves defective by reason of improper workmanship or materials.
11 Free Technical Support StorCase provides free technical support. If you experience any difficulty during the installation or subsequent use of a StorCase product, please contact StorCases Technical Support Department prior to servicing your system. This warranty covers only repair or replacement of defective StorCase products, as described above. StorCase is not liable for, and does not cover under warranty, any costs associated with servicing and/or installation of StorCase products.